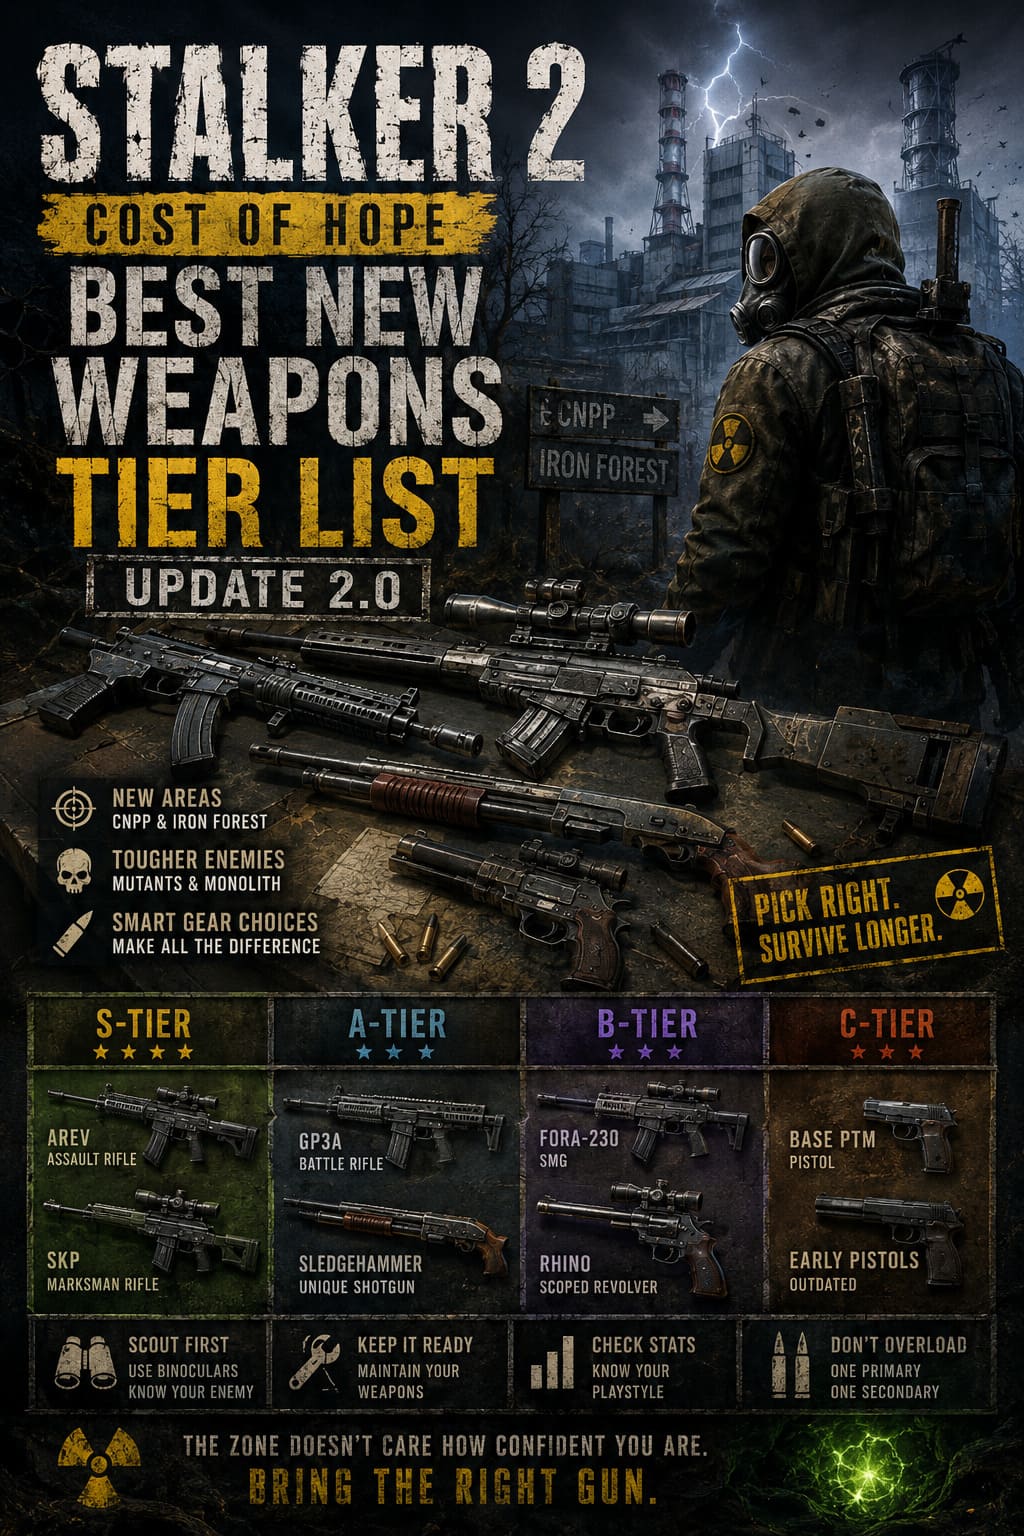
STALKER 2 Cost of Hope Best New Weapons Tier List (Update 2.0)
STALKER 2: Cost of Hope changes the way I approach the Zone. After spending countless hours learning which weapons are actually worth carrying and which ones only look impressive on paper, I can say one thing with confidence: your old favorite gun might not be the best choice anymore. The massive 2.0 update and the Cost of Hope expansion push players into nastier territory, including the Chornobyl Nuclear Power Plant and the Iron Forest, where bad equipment choices can turn a routine expedition into a quick trip back to the last save.
The new areas aren’t just bigger playgrounds. They throw tougher mutants, better-equipped human enemies, faction clashes, anomalies, and much more dangerous encounters at you. That makes weapon selection incredibly important. You can have excellent armor and a backpack full of medkits, but none of that matters when a Monolith squad catches you in the open with an underpowered rifle.
I’ve ranked the new and upgraded weapons based on the things that actually matter during a long STALKER 2 run: damage, accuracy, recoil, ammunition availability, armor penetration, durability, upgrade potential, and how useful the weapon remains when the Zone decides to throw something horrible at you.
How I Ranked the Weapons in STALKER 2 Update 2.0
A weapon tier list can easily become meaningless if it only considers raw damage. STALKER 2 is not that kind of game. A rifle that hits incredibly hard but destroys your shoulder with recoil and costs a fortune to maintain isn’t automatically better than a slightly weaker weapon that stays accurate and reliable for an entire expedition.
| Tier | What It Means |
|---|---|
| S-Tier | Outstanding weapons with exceptional damage, handling, versatility and upgrade potential |
| A-Tier | Powerful and reliable choices with only a few meaningful drawbacks |
| B-Tier | Useful weapons that perform well in specific situations or during the mid-game |
| C-Tier | Niche, outdated or inefficient weapons that should be replaced when possible |
The biggest factor for me is consistency. The Zone loves creating situations where you suddenly need to fight at a different range, against a different enemy type, with almost no warning. A great weapon needs to survive those moments.
S-Tier Weapons – The Guns I Would Take Into the Deep Zone
Arev Assault Rifle
The Arev is easily one of the most impressive additions to the Cost of Hope weapon lineup. If you gave me one rifle and told me I had to explore the new regions without changing weapons for the rest of the trip, this would probably be my pick.
What immediately stands out is the combination of excellent accuracy and manageable vertical recoil. The Arev doesn’t feel like a weapon that is constantly trying to climb out of your hands when you hold the trigger. That’s especially valuable during encounters with heavily armed human enemies, where wasting half a magazine because of recoil can be the difference between surviving and staring at the reload screen while someone shoots at you.
Its real strength, though, is flexibility. With the right technician upgrades and optics, the Arev can be tuned toward a precise mid-range rifle or configured for more aggressive close-to-medium-range combat. That makes it incredibly comfortable for general exploration.
The weapon also fits the new Western-style equipment options particularly well. Once you start pairing it with improved optics, it becomes extremely effective against Monolith squads and other heavily armored targets.
My verdict: If you find a good Arev early enough and have the resources to maintain it, build around it. It’s that good.
SKP Marksman Rifle
The SKP Marksman Rifle is the weapon for players who enjoy making enemies regret standing in the wrong place.
I’ve always had a soft spot for precision rifles in STALKER games, but the SKP takes the concept further by sitting somewhere between a traditional sniper and a powerful battle rifle. It delivers serious damage at long distances while remaining useful when an encounter inevitably gets messy.
Its biggest advantage is the ability to remove dangerous human targets before they can properly respond. Against armored squads, a clean headshot can completely change the fight. Instead of getting dragged into a prolonged firefight, you can potentially remove the most dangerous enemy before the rest of the group even realizes where the shot came from.
The SKP also gets bonus points for its relatively reasonable maintenance costs compared with some older high-end precision weapons. That’s important because a sniper rifle that spends more time at the technician than in your hands isn’t much use.
My verdict: For stealth players and anyone who loves scouting before pulling the trigger, the SKP is a monster.
A-Tier Weapons – Nearly Perfect, With a Catch
GP3A Battle Rifle
The GP3A is one of those weapons that makes you feel powerful the moment you pick it up. It delivers brutal kinetic damage and has enough stopping power to deal with both heavily armored humans and tougher mutants.
So why isn’t it S-Tier?
The answer is simple: weight and recoil.
The GP3A becomes considerably harder to control when you’re firing continuously. Trying to empty the magazine on full automatic can turn a precise firefight into an expensive ammunition-burning session. I personally prefer using it in controlled bursts or single shots. Once you stop treating it like a standard assault rifle, the GP3A becomes much more impressive.
Upgrade the stability, add a suitable sight and learn its recoil pattern, and this rifle becomes extremely dangerous in enclosed areas. Underground facilities, bunkers and defensive positions are where it really shines.
My verdict: Heavy, aggressive and slightly temperamental, but absolutely worth mastering.
Sledgehammer – Unique Variant
Shotguns have always had a special place in my STALKER loadouts. There are situations where another rifle simply doesn’t solve the problem fast enough, and that’s where the unique Sledgehammer variant earns its place.
This modified pump-action shotgun is designed for brutal close-range encounters. Its ability to use heavy ammunition gives it tremendous stopping power, and the improved cycling speed makes it much more forgiving than a sluggish traditional pump shotgun.
The Iron Forest is exactly the kind of place where I’d want this weapon nearby. If a Chimera suddenly appears through the fog or a Pseudogiant turns a quiet exploration trip into a panic simulator, the Sledgehammer gives you a fighting chance.
The downside is capacity. You can’t casually spray shells at multiple enemies and expect the problem to disappear. Reloading is still relatively slow, so every shot needs to count.
My verdict: Keep it close when exploring mutant-heavy areas. Just don’t forget to reload before entering a suspicious-looking building.
B-Tier Weapons – Useful Workhorses
Fora-230 Submachine Gun
The Fora-230 is the kind of gun I enjoy using even though I wouldn’t call it a top-tier endgame weapon.
Its biggest advantage is ammunition economy. It uses common pistol ammunition, fires rapidly and feels comfortable during close-range fights. Against weaker mutants and lightly equipped enemies, it can shred targets surprisingly quickly.
The problem appears when armored enemies enter the equation. The Fora-230 lacks the armor penetration needed to comfortably deal with high-level human opponents. You can easily find yourself dumping an entire magazine into an armored target while wondering why you didn’t bring something heavier.
Durability is another weakness during extended automatic fire.
Still, for early exploration, close-range mutant control and situations where you want to conserve your primary rifle ammunition, the Fora-230 has a place.
My verdict: Fun, cheap and practical, but don’t bring it expecting to dominate heavily armored enemies.
Rhino Revolver – Scoped Variant
The scoped Rhino is a fascinating weapon because it almost turns your sidearm slot into a miniature sniper platform.
The revolver already has tremendous damage, and adding a scope makes it much more versatile. You can carry a powerful backup weapon without taking up the same space or weight as another full-sized rifle.
The downside is that the Rhino punishes mistakes. Its recoil is substantial, the reload is slow, and missing multiple shots can leave you in a very uncomfortable situation. You need to slow down and actually aim instead of treating it like a panic button.
In experienced hands, though, the Scoped Rhino is excellent for finishing wounded enemies or dealing with targets that require more stopping power than a normal pistol can provide.
My verdict: A fantastic secondary for accurate players, but definitely not the easiest gun to master.
C-Tier Weapons – Time to Move On
Base PTM and Other Early Pistols
The standard PTM is perfectly fine when you have nothing else. That’s about the nicest thing I can say about it in the late stages of Cost of Hope.
Early in the game, these pistols are useful because ammunition is easy to manage and the weapons are lightweight. They can also save your primary ammunition when you’re dealing with harmless scavengers or weaker enemies.
But once you enter the more dangerous regions, the limitations become painfully obvious. Against heavily armored Duty, Freedom or other high-level combatants, a basic pistol simply doesn’t provide enough stopping power.
The weapon handling improvements in Update 2.0 make pistols more pleasant to use, but better handling doesn’t magically turn an entry-level handgun into an endgame monster.
My verdict: Keep one around as an emergency backup, but replace it the moment you find something substantially better.
The Best STALKER 2 Loadout for Cost of Hope
If I were starting a serious expedition into the new territories, I’d build my loadout around two completely different combat roles.
My primary would be the Arev Assault Rifle, because it covers the widest range of situations. I’d pair it with the Sledgehammer for mutants and emergencies where raw close-range stopping power matters more than precision.
For players who prefer stealth, I’d swap the Arev for the SKP Marksman Rifle. That setup turns the game into a much more deliberate experience: scout, identify the biggest threat, eliminate it, reposition and only then commit to the firefight.
Weapon Management Tips I Actually Recommend
The new systems introduced with Update 2.0 make preparation more important than ever. I wouldn’t recommend simply carrying the weapon with the highest damage number and calling it a day.
Use the New Binoculars Before Starting Fights
Scouting lets you identify enemy positions and determine whether you’re dealing with a long-range engagement or a close-quarters nightmare. If you can see the fight coming, you can choose between the SKP, Arev or shotgun before things get chaotic.
Watch Weapon Condition Carefully
A fantastic rifle in terrible condition can become a liability. Repair costs matter, especially during long trips where you’re already spending money on ammunition, medical supplies and equipment upgrades.
Pay Attention to Your Statistics
The expanded PDA information gives you a better idea of how you’re actually playing. If most of your kills come from medium-range engagements, investing heavily in a close-range SMG may not make much sense.
Most importantly, don’t overload yourself. Carrying three rifles because you’re afraid of being unprepared sounds smart until your movement and stamina start suffering. One reliable primary, one specialized secondary and a sensible amount of ammunition is usually a much better setup.
Final Weapon Tier List
After testing these weapons across different combat situations, my personal ranking looks like this:
| Tier | Weapons | Best Use |
|---|---|---|
| S-Tier | Arev, SKP Marksman Rifle | General Combat, Precision And Endgame Exploration |
| A-Tier | GP3A, Unique Sledgehammer | Heavy Combat And Mutant Hunting |
| B-Tier | Fora-230, Scoped Rhino | Close Range, Backup And Specialized Encounters |
| C-Tier | Base PTM, Early Pistols | Emergency Use And Early Game |
The biggest lesson from STALKER 2: Cost of Hope is that the best weapon isn’t necessarily the one with the biggest damage number. The Zone rewards players who understand their equipment and know exactly when to switch from precision shooting to aggressive close-range combat.
For me, the Arev is the standout all-rounder, while the SKP is the weapon I’d choose when I want to play like a proper stalker instead of charging into every fight guns blazing. The GP3A and unique Sledgehammer are fantastic alternatives when brute force is required, while the Fora-230 and Scoped Rhino fill useful secondary roles.
Once you’re heading toward the CNPP or pushing through the Iron Forest, every bullet starts to matter a lot more. Keep your best weapons repaired, carry ammunition intelligently, scout before engaging and don’t underestimate what can be hiding around the next corner.
The Zone doesn’t care how confident you are. Bring the right gun.