Iron Nest Triangulation Guide: How to Target, Aim, and Fire (Map Tools Tutorial)
IRON NEST: Heavy Turret Simulator (2026) is the kind of game that looks simple from the outside and then completely destroys your confidence after the first few missions. You sit inside a massive 5000-ton walking battleship loaded with terrifying firepower, but pulling the trigger is honestly the easiest part of the entire experience.
The real fight happens before the shell ever leaves the barrel. Unlike most modern military games, IRON NEST refuses to give players easy solutions. There are no glowing enemy markers, no automatic targeting systems, and no futuristic radar showing exactly where your enemies are hiding. You are an artillery commander relying on field reports, a teleprinter, physical map tools, and your own calculations.
After spending hours learning the systems, missing targets by ridiculous distances, and watching expensive shells disappear into empty fields, I can confidently say that triangulation is the mechanic every new operator needs to understand. Once the system finally clicks, the entire game changes. You stop guessing and start controlling the battlefield.
This guide breaks down everything you need to know about targeting in IRON NEST, including how to use spotters, how to calculate enemy positions, how to create a firing solution, and how to avoid the mistakes that cause those painful kilometer-wide misses.
Iron Nest Heavy Turret Simulator Release Date & Standalone Multiplayer Game News
Understanding the Iron Nest Map System and Coordinates
Before you start drawing lines and measuring distances, you need to understand how the tactical map works. The map table is your command center, and every successful artillery strike begins here.
The battlefield is divided into large sectors marked with letters and numbers. Inside every sector are smaller grid sections that allow you to locate friendly units, observation teams, and enemy positions.
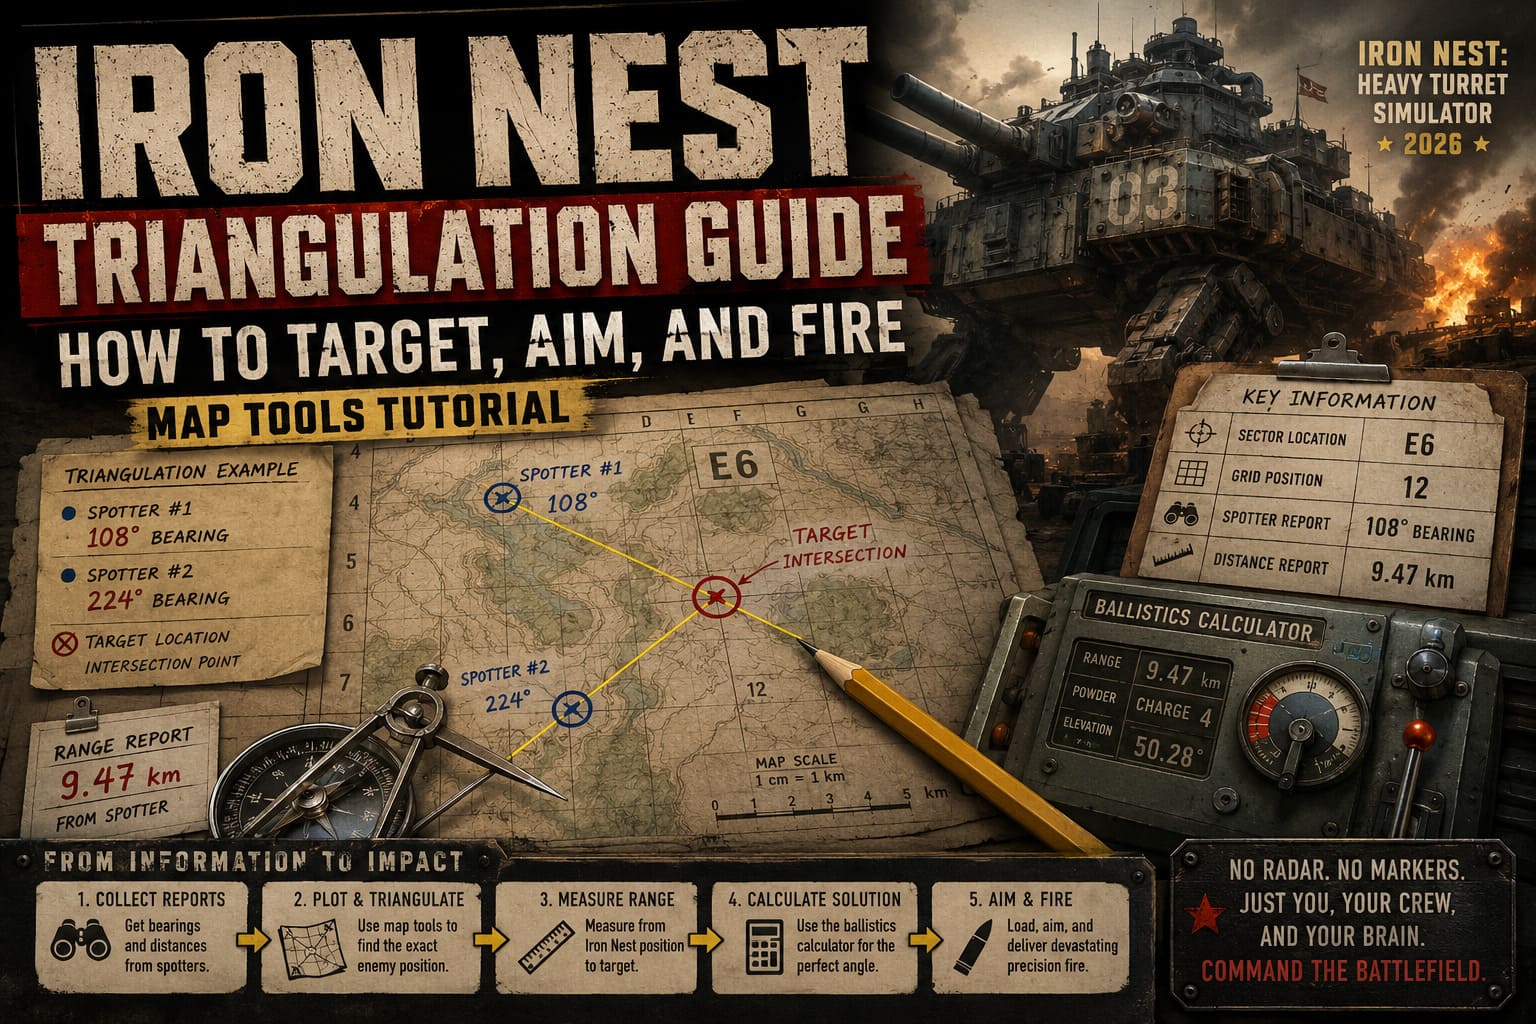
| Information | Example | Purpose |
|---|---|---|
| Sector Location | E6 | Identifies the general battlefield area |
| Grid Position | 12 | Shows the exact location on the map |
| Spotter Report | 108° Bearing | Provides enemy direction |
| Distance Report | 9.47 km | Shows range from observer |
The biggest mistake new players make is assuming the Iron Nest automatically knows where it is. It does not. Your massive armored machine changes position between missions, and your previous calculations become useless if you forget to update your location.
A wrong starting position can completely destroy your firing solution. You may calculate everything perfectly, load the correct ammunition, and still watch your shell land nowhere near the enemy because the map information was outdated.
Before Every Mission Check These Things:
- Confirm the current Iron Nest coordinates using the teleprinter information.
- Move the base marker to the correct position manually on the map.
- Place all spotter markers correctly before attempting calculations.
This small preparation step saves a huge amount of frustration later. Many players think their artillery system is broken when the real problem is a forgotten map update.
How Spotters Work in Iron Nest
Your spotter teams are your eyes across the battlefield. They do not provide exact enemy coordinates. Instead, they send partial information that you must combine to discover the target location.
Usually, multiple spotters are positioned around the battlefield. Each observer sees the enemy from a different angle, allowing you to use triangulation to find the exact position.
The easiest way to understand it is simple: one spotter gives you a direction, another gives you another direction, and where those two lines meet is where the enemy is hiding.
This system feels slow at first, especially when you are under pressure and enemy forces are moving. However, the satisfaction of correctly calculating a target and watching your massive cannon destroy it is one of the best parts of the game.
Step-by-Step Target Triangulation Using Bearings
The most common targeting scenario in IRON NEST involves two spotters reporting different directional bearings.
Example:
- Spotter #1 reports: 108 degrees
- Spotter #2 reports: 224 degrees
Your mission is to draw both lines on the map and find the exact point where they intersect.
Step 1: Select the Yellow Pencil Tool
Pick up the yellow pencil from your map table. This tool allows you to draw directional lines based on the information received from your spotters.
Place the starting point directly on the blue marker representing your first observer.
Step 2: Plot the First Bearing
Click and drag from Spotter #1. Rotate the line until the display shows the exact reported value.
For this example, adjust the line until it reaches:
108 degrees
Extend the line across the map. The important part is not the length of the line, but where it eventually crosses another calculation.
Step 3: Plot the Second Bearing
Move to Spotter #2 and repeat the process. Adjust the yellow line until it matches:
224 degrees
Extend this line until it intersects with the first one.
Step 4: Mark the Target Location
The exact point where both lines meet is the enemy position. Place your red target marker directly on this intersection.
This is the moment where your battlefield puzzle is solved. You now know where the enemy is located.
Using Distance and Bearing Together
Not every mission gives you two directional reports. Sometimes you will receive mixed information, such as one spotter providing a bearing while another provides a distance measurement.
- One spotter gives direction.
- Another spotter gives distance.
- A single spotter may provide both pieces of information.
If a report says that a target is exactly 9.47 kilometers away from a spotter, you need to use the compass tool.
Place the compass point on the spotter location and adjust the radius according to the map scale. Draw a circle or arc around the observer position.
Now combine that information with your bearing line. The location where the directional line touches the distance circle is your target position.
This method feels confusing during the first few attempts, but after several missions it becomes second nature. The game rewards players who slow down and think like actual artillery operators.
Turning Coordinates Into a Real Firing Solution
Finding the enemy position is only half of the process. The next step is converting that information into a working firing solution for your massive artillery cannon.
The final calculation must always begin from the current Iron Nest position, not from your spotters.
Step 1: Measure the Gun-to-Target Distance
Take the yellow pencil tool again and draw a line from your current Iron Nest position directly toward the red target marker.
The tool will provide two important pieces of information:
- Bearing: The direction your turret must rotate.
- Distance: The total firing range.
Record these numbers carefully because they determine the entire firing process.
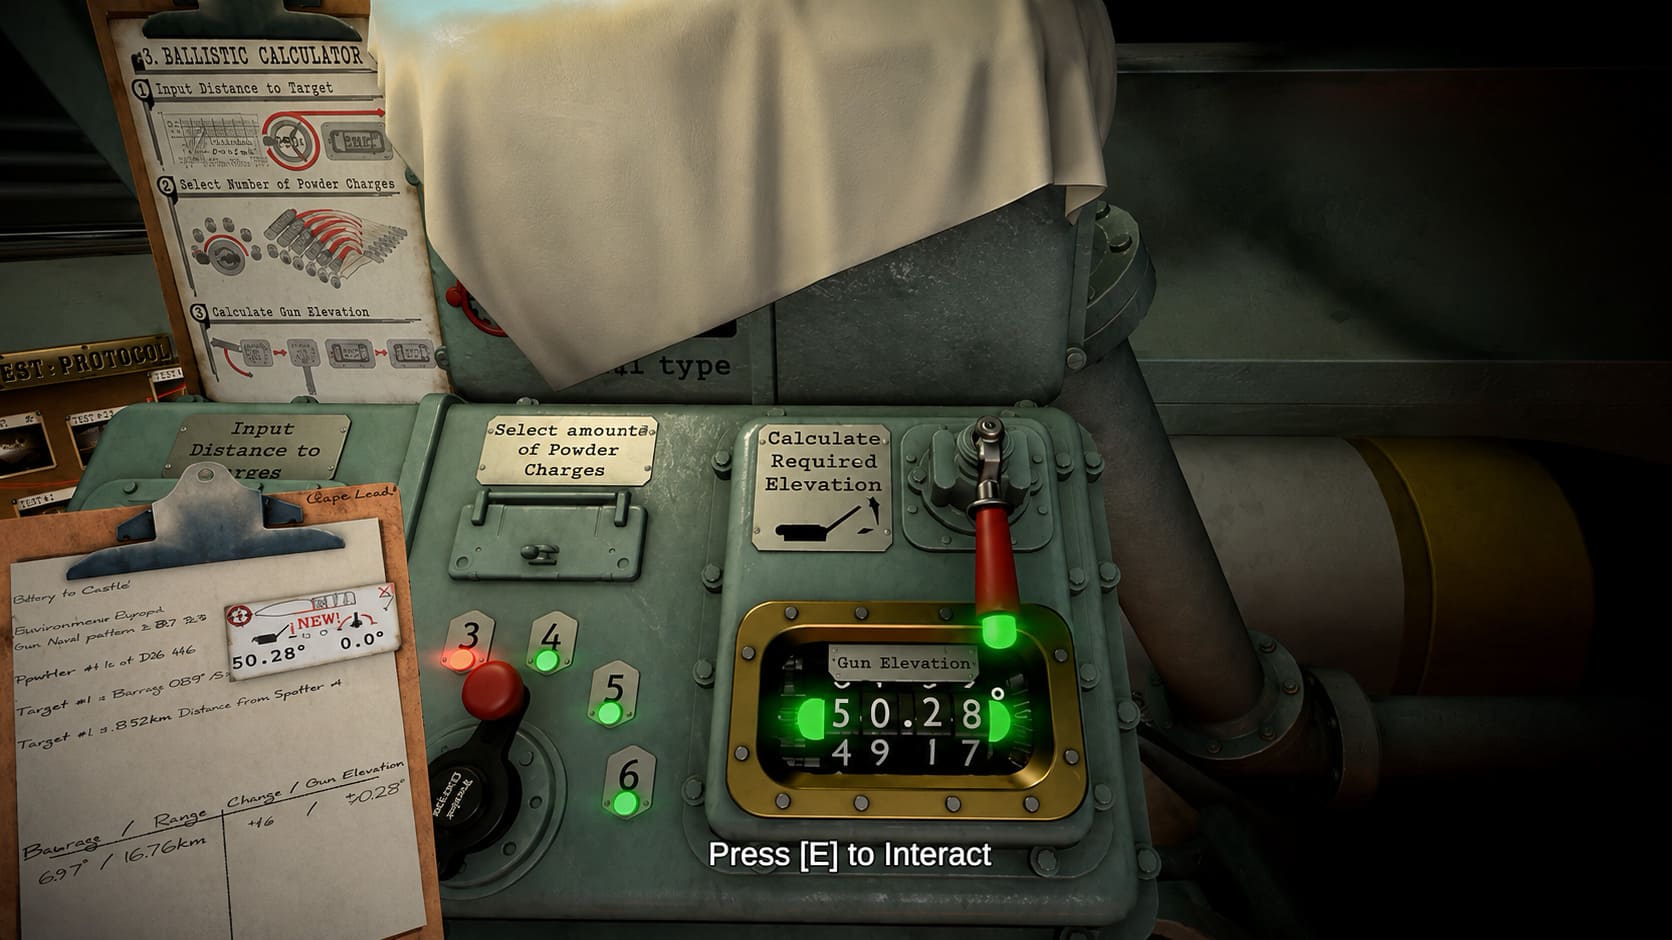
Step 2: Use the Ballistics Calculator
Inside the command area, access the mechanical ballistics calculator. Enter the measured range and allow the machine to calculate the required elevation angle.
The result depends on several factors:
- Target distance.
- Selected powder charge.
- Projectile type.
Using the wrong powder amount creates predictable problems. Too little power causes the shell to fall short. Too much power sends the projectile beyond the target and wastes valuable ammunition.
Step 3: Aim and Fire the Main Gun
Return to your primary artillery controls and manually complete the firing process.
- Rotate the turret to the correct bearing.
- Adjust barrel elevation to the calculated angle.
- Load the artillery shell.
- Add the required powder charges.
- Fire the weapon.
Few games create the same feeling as watching a shell land exactly where your calculations predicted. It is slow, intense, and incredibly satisfying.
Common Iron Nest Targeting Mistakes Players Make
| Mistake | Why It Happens | Solution |
|---|---|---|
| Wrong Iron Nest Position | Players forget the machine moved | Update coordinates before every mission |
| Incorrect Spotter Placement | Markers placed on wrong locations | Follow teleprinter information carefully |
| Messy Map Lines | Old calculations remain visible | Clear previous drawings regularly |
| Wrong Powder Charge | Range calculation ignored | Follow ballistic calculator results |
Star Shell Missions and Hidden Targets
Night operations introduce another interesting challenge. During these missions, you may need to use illumination rounds instead of traditional explosives.
When a star shell explodes, your spotters provide information based on the flash location. Hidden enemy positions can then be discovered through careful map work.
Star Shell Targeting Process:
- Locate the flash position on the map.
- Draw a yellow line through the center of the split arrow indicator.
- Extend the line to the reported distance.
- Place the target marker where the information points.
These missions are slower than standard artillery strikes, but they create some of the most memorable moments in the game.
Final Thoughts: Becoming a True Iron Nest Commander
IRON NEST: Heavy Turret Simulator is not a game about quick reactions. It is about patience, precision, and understanding the systems placed in front of you.
The first hours can feel brutal. Missing a target because you forgot to update your position hurts. Watching your massive cannon fire a perfect shot after carefully calculating every detail feels completely different.
Master the map table, trust your spotters, and learn the triangulation system. Once you understand how everything connects, you stop being just another operator inside a giant machine.
You become the person controlling the battlefield, deciding exactly where the next devastating artillery strike will land.