STALKER 2 Cost of Hope Unique Artifacts Stats: Ultimate Guide to Rare & Legendary Finds
If there is one thing I have learned from spending way too many hours wandering through the Zone, it is this: never underestimate an artifact just because it looks like a weird lump of glowing garbage. In STALKER 2, the right artifact setup can completely change how you approach exploration, combat, carrying loot, and even those moments when the game decides to throw an anomaly at your face for no apparent reason.
The Cost of Hope expansion pushes that system even further. New dangerous areas, tougher anomaly fields, and more demanding exploration routes make artifact hunting feel less like optional treasure hunting and more like a survival profession. Some of the rarest pieces can dramatically improve Skif’s survivability, but the best bonuses often come with nasty radiation or environmental drawbacks.
This guide breaks down the most valuable unique and legendary artifacts in STALKER 2: Cost of Hope, what makes each one special, and how I would actually use them in a real playthrough rather than simply staring at their numbers in the inventory.
STALKER 2 Cost of Hope DLC: Where to Find Heavy Monolith Armor
Why Unique Artifacts Matter So Much
Regular artifacts are useful, but once you start finding the genuinely rare stuff, the entire progression system starts to feel different.
The best artifacts aren’t simply stronger versions of ordinary loot. They can change your movement, survivability, stamina management, carrying capacity, or resistance to specific environmental hazards. That matters enormously in STALKER 2 because the game constantly forces you to make ugly compromises.
Do you want more protection but increased radiation? More stamina but less room for defensive gear? Better survivability inside anomalies while accepting a brutal environmental penalty?
That’s where artifact builds become interesting.
The Cost of Hope content also makes exploration considerably more rewarding. Dangerous anomaly fields and difficult locations are no longer just obstacles standing between you and the next quest marker. Sometimes the entire reason to walk into a nightmare is sitting right in the middle of it.
Arch-Artifacts and Rare Finds
The really desirable artifacts are generally tied to dangerous anomaly zones, special locations, puzzles, or progression through high-level areas. Finding one can feel completely different from picking up a random artifact during ordinary exploration.
And yes, your basic detector isn’t always going to cut it.
If you’re serious about collecting the rarest artifacts, upgrading your detection equipment should be one of your priorities. Better detectors make artifact hunting much less dependent on blindly wandering through hazardous terrain and hoping something valuable appears.
I personally prefer preparing for an artifact hunt like a mini-expedition. Carry enough anti-radiation supplies, keep medical items available, make sure the weapon condition isn’t terrible, and leave enough inventory space for whatever strange object the Zone decides to give you.
Because nothing hurts more than finding something rare and realizing you’re overloaded with junk.
The Best Unique and Legendary Artifacts
Here are the artifacts that deserve the most attention if you’re building a serious late-game loadout.
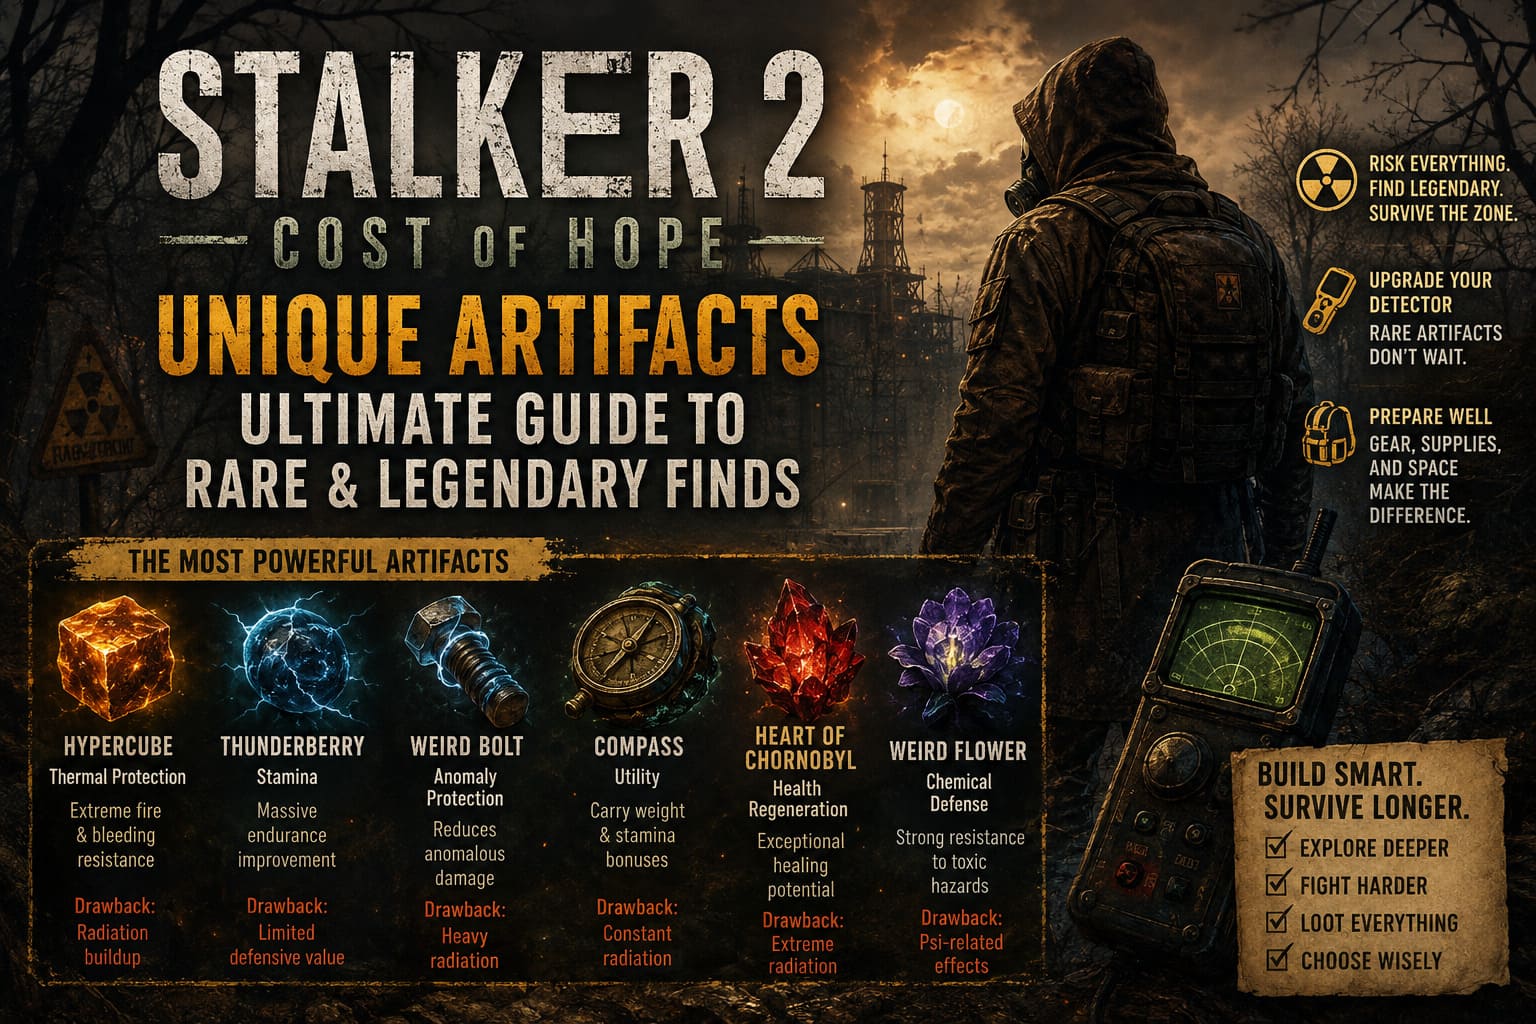
| Artifact | Main Strength | Major Benefit | Main Drawback |
|---|---|---|---|
| Hypercube | Thermal Protection | Extreme fire and bleeding resistance | Radiation buildup |
| Thunderberry | Stamina | Massive endurance improvement | Limited defensive value |
| Weird Bolt | Anomaly Protection | Reduces anomalous damage | Heavy radiation |
| Compass | Utility | Carry weight and stamina bonuses | Constant radiation |
| Heart of Chornobyl | Health Regeneration | Exceptional healing potential | Extreme radiation |
| Weird Flower | Chemical Defense | Strong resistance to toxic hazards | Psi-related effects |
1. Hypercube — The Fireproof Monster
The Hypercube is the kind of artifact that immediately makes you reconsider your normal equipment.
Its biggest advantage is thermal protection, making it incredibly valuable when you’re dealing with intense fire-based anomalies and hostile environments. It also provides outstanding bleeding resistance, which is something I value more than many players probably realize.
STALKER firefights have a nasty habit of turning into messy attrition battles. You take a few hits, start bleeding, stumble into cover, use a medkit, and then another mutant decides that you’re apparently today’s lunch.
The Hypercube helps shut down that problem.
Its weakness is radiation accumulation, so you can’t simply equip it and forget about the consequences. But if you’re heading into an area dominated by thermal hazards, this is one of the first artifacts I’d reach for.
Why I Like It
- Exceptional thermal protection
- Excellent bleeding resistance
- Strong choice for dangerous anomaly-heavy areas
- Particularly useful during difficult combat encounters
The Hypercube isn’t subtle. It is a brute-force survival tool.
2. Thunderberry — The Stamina King
The Thunderberry is one of those artifacts that looks straightforward on paper but becomes ridiculous once you actually play with it.
Stamina management is a constant annoyance in STALKER 2. You’re running between locations, carrying weapons, armor, ammunition, food, medical supplies, and enough random junk to open a second-hand military surplus store.
Then your stamina disappears.
Thunderberry attacks that problem directly with a huge endurance and stamina recovery boost. The difference is immediately noticeable when crossing large regions or escaping mutants.
It also makes overloaded exploration much more forgiving.
If you spend most of your time exploring rather than sitting in one location waiting for enemies, Thunderberry is ridiculously useful.
Best Use Case
Pair it with an artifact that improves carrying capacity or reduces the penalties associated with heavy exploration gear. That combination turns long-distance travel from an exhausting crawl into something much more manageable.
3. Weird Bolt — The Anomaly Specialist
The Weird Bolt is where artifact hunting starts feeling like classic STALKER madness.
Its appeal comes from its unusual relationship with anomalies. Instead of simply giving you a passive defensive bonus, it becomes particularly valuable when you’re actually inside dangerous anomalous territory.
That makes it a specialist tool.
If you’re exploring a location where normal movement is already hazardous, the Weird Bolt can give you a crucial survival buffer. It’s especially interesting for players who deliberately search dangerous anomaly fields instead of avoiding them.
The catch is obvious: radiation.
This isn’t an artifact you equip casually and forget about. You need to build around it.
But that’s exactly what makes it interesting. The best STALKER builds aren’t about stacking the biggest green numbers. They’re about figuring out which drawbacks you can actually live with.
4. Compass — The Hoarder’s Best Friend
I have a weakness in STALKER games.
I loot everything.
Weapons? Take them. Ammunition? Obviously. Strange food item? Probably useful. Random piece of equipment worth almost nothing? Somehow that’s coming with me too.
That’s why the Compass is so useful.
Its combination of stamina regeneration and increased carrying capacity makes it one of the strongest utility artifacts for exploration. The extra weight allowance alone can completely change how you approach long trips.
Instead of constantly dumping equipment at the nearest stash, you can keep exploring.
The Compass isn’t necessarily the most exciting artifact in a damage-focused build, but for anyone who treats the Zone like a giant abandoned supermarket, it is fantastic.
5. Heart of Chornobyl — Massive Power, Horrible Price
The Heart of Chornobyl is the artifact for players who look at a terrifying radiation penalty and say, ‘Yeah, I can probably manage that.’
Its biggest attraction is health regeneration. A powerful passive healing effect can dramatically increase your staying power during ordinary combat and exploration.
The problem is that the artifact’s radiation output is brutal.
This creates a classic STALKER dilemma. You gain something incredibly powerful, but the Zone immediately demands payment.
You can’t simply slap the Heart of Chornobyl onto your belt and expect to become immortal. You need supporting equipment capable of controlling the radiation problem.
When properly balanced, though, the payoff can be enormous.
6. Weird Flower — Beautiful, Strange, Useful
The Weird Flower is another artifact that rewards players who spend a lot of time exploring hazardous environments.
Its strength comes from resistance against chemical and acidic threats, combined with a smaller health-related benefit. That makes it especially attractive when you’re entering regions where environmental damage is a bigger problem than enemy gunfire.
The downside is its unusual effect on perception and psi-related conditions.
That’s something I actually appreciate.
An artifact that gives you everything with no meaningful drawback would be boring. The Weird Flower feels more like a STALKER artifact should: powerful, useful, and just slightly unsettling.
How I Would Build an Artifact Belt
Owning six amazing artifacts doesn’t mean you should equip all of them.
That’s one of the easiest mistakes to make.
The best setup depends on what you’re doing. Exploration, combat, artifact hunting, and anomaly-heavy missions all reward different combinations.
Exploration Build
For general exploration, I’d prioritize Thunderberry + Compass.
Thunderberry keeps your stamina under control while Compass helps with carrying capacity. Together, they solve two of the most annoying problems during long journeys.
Then I’d add radiation-management artifacts or defensive pieces depending on the region.
This is the build I’d use when I know I’m going to spend an hour wandering around, looting buildings, searching anomalies, and returning home with far more junk than I originally planned to carry.
Combat Build
For difficult firefights, I’d lean toward Hypercube + Weird Bolt.
The Hypercube gives you excellent protection against thermal hazards and bleeding, while Weird Bolt adds another layer of survivability when anomalies become part of the battlefield.
This setup is particularly useful when the game throws environmental danger and hostile factions at you simultaneously.
And STALKER loves doing that.
High-Risk Power Build
For players who want maximum benefits and don’t mind micromanaging drawbacks, the Heart of Chornobyl becomes the centerpiece.
Build the rest of your equipment around radiation management and survivability. This isn’t the easiest setup to maintain, but when everything is balanced correctly, the regeneration can make Skif surprisingly difficult to kill.
Just don’t get careless.
The Zone has a talent for turning ‘I think I’m fine’ into a reload screen.
The Biggest Mistake New Players Make With Artifacts
Don’t judge artifacts individually.
Judge them as part of the entire loadout.
A huge stamina bonus can be useless if your radiation level becomes unbearable. A powerful healing effect means little if the artifact itself creates another survival problem. Carrying more equipment is fantastic until you’re spending all your money compensating for the consequences of being overloaded.
Artifact synergy matters more than individual stats.
That is probably the biggest lesson I’d give to anyone entering the Cost of Hope content.
Is Artifact Hunting Actually Worth It?
Absolutely.
The best artifacts aren’t just collectible trophies. They can fundamentally change the way you play STALKER 2.
Thunderberry can turn exhausting travel into fast exploration. Compass makes heavy looting much more practical. Hypercube is a monster in thermal environments, while Weird Bolt rewards players willing to push directly into dangerous anomaly zones.
Then you have artifacts like Heart of Chornobyl that feel almost absurdly powerful until you remember that the Zone always wants something in return.
That’s what makes the system work.
You’re never simply asking, ‘Which artifact has the biggest bonus?’ You’re asking, ‘What am I willing to sacrifice for this advantage?’
And that’s exactly the kind of decision that makes STALKER so addictive.
Final Verdict
The artifact hunt in STALKER 2: Cost of Hope is at its best when you’re not treating it like a checklist.
You hear about a rare artifact. You investigate. You prepare your gear. You walk into an area that looks like a terrible place to be, survive a few anomalies, burn through supplies, fight something that absolutely did not need to be that aggressive, and finally see that strange glow in the distance.
That’s the good stuff.
The numbers matter, sure. Stats matter when you’re building an optimized late-game character. But the real appeal is the journey to obtain them.
Hypercube, Thunderberry, Weird Bolt, Compass, Heart of Chornobyl, and Weird Flower each serve a different purpose, and the smartest stalkers won’t blindly equip whichever artifact looks strongest. They’ll build around the Zone they’re entering, the enemies they’re expecting, and the weaknesses they can afford to tolerate.
So upgrade your detector, stock up on anti-radiation supplies, repair your weapons, clear some inventory space, and get ready to make questionable decisions in extremely dangerous places.
That’s STALKER.
And honestly, I wouldn’t want it any other way.