RuneScape Dragonwilds Hard Leather Guide: How to Craft, Upgrade, and Farm
If there is one resource in RuneScape: Dragonwilds that made me stop and rethink my entire crafting setup, it is Hard Leather. On paper, it sounds like another basic survival-game material. In practice, getting a steady supply means building the right stations, hunting the right animals, venturing into the Whispering Swamp, and keeping a surprisingly involved crafting loop running at your base.
After spending time pushing through Ashenfall and working toward the stronger Tier 4 equipment, I found that Hard Leather becomes much less annoying once you stop treating it as a single resource and start thinking of it as the final product of a small production chain.
And honestly, that is one of the things I like about Dragonwilds. It takes familiar RuneScape materials and turns them into something that actually fits a survival-crafting game. You are not just clicking an NPC dialogue and walking away with an upgrade. You have to build the infrastructure, gather the ingredients, and make the whole operation work.
Here is the route I use to craft Hard Leather efficiently in RuneScape: Dragonwilds, including where I get Standard Leather, how I collect Swamp Tar, and what you need for the Tanner’s Kit.

Hard Leather Recipe at a Glance
The actual recipe is straightforward once your base is prepared.
| Material | Quantity | How I Get It |
|---|---|---|
| Standard Leather | 2 | Process Animal Hides at the Tannery |
| Adhesive | 1 | Process Swamp Tar at the Kiln |
| Hard Leather | 1 | Craft at an upgraded Tannery |
Each completed Hard Leather craft also gives 20 Artisan XP, so this isn’t just a gear requirement. If you’re pushing your crafting progression at the same time, you can turn the farming grind into useful experience.
The catch is that you cannot simply throw these ingredients into a normal crafting station. You need a Tannery equipped with a Tanner’s Kit.
Why Hard Leather Matters for Tier 4 Progression
I would not recommend rushing Hard Leather simply because you see it in the crafting menu. It becomes important when you’re preparing to move deeper into Ashenfall and start building stronger equipment.
For me, this is where the progression of Dragonwilds starts feeling more serious. Early equipment is relatively forgiving, but once you begin dealing with stronger enemies and preparing for major encounters, having your armor and tools upgraded makes a noticeable difference.
Hard Leather is particularly important for Tier 4 ranged and hybrid equipment, while also appearing in several advanced crafting recipes.
So if you have reached the point where your next gear upgrades suddenly require materials you have never seen before, don’t panic. You are probably looking at the same progression wall I hit: the game expects you to expand your base production before you can move forward.
Step 1: Build Your Crafting Pipeline
Before going anywhere near the Whispering Swamp, I recommend checking your base.
You need three important pieces of infrastructure:
- Sawmill
- Kiln
- Tannery with Tanner’s Kit
The Sawmill is responsible for turning Ash Logs into Ash Planks. Those planks become important for advanced station construction and the Tanner’s Kit.

The Kiln handles your material processing. Most importantly for this guide, it is where Swamp Tar becomes Adhesive.
Your Tannery is where the final Hard Leather production happens.
Sawmill
The Sawmill requires materials such as Ash Logs, Bronze Bars, and Stone. Its main purpose here is producing Ash Planks for the more advanced crafting infrastructure.
I strongly recommend processing your Ash Logs whenever you’re back at your base instead of waiting until you suddenly need a large stack of planks. Nothing kills the momentum of a good exploration session faster than returning home and discovering that you’re missing one basic processed material.
Kiln
The Kiln is your key to Adhesive.
You will need basic construction materials such as Stone and Clay, with Clay being particularly easy to find around riverbanks and similar areas.
Once the Kiln is operational, you can process the Swamp Tar you collect later into Adhesive.
Tannery + Tanner’s Kit
This is the important upgrade.
The Tanner’s Kit is not a replacement for the Tannery. It is an attachment that needs to be placed directly next to your existing Tannery.
Once you position it correctly, the station gains the functionality needed for the Hard Leather recipe.
If the recipe does not appear after building the kit, check its placement first. This is one of those survival-game details that can make you think your save is broken when the real problem is simply station positioning.
Step 2: Get the Tanner’s Kit Materials
The Tanner’s Kit itself requires several materials, which is why Hard Leather feels like a progression milestone rather than a basic crafting recipe.
You will need:
- Ash Planks
- Bronze Bars
- Coarse Thread
- Adhesive
The first two should already be part of your normal base-production routine by this stage.
Coarse Thread can come from vendors or be crafted from suitable plant-based materials, depending on how you have been managing your resources.
Adhesive is the part that usually sends players back out into the world.
And that brings us to the most important farming trip.
Step 3: Farm Animal Hides for Standard Leather
The first ingredient in Hard Leather is Standard Leather, and this is easily the less complicated half of the recipe.
You need 2 Standard Leather for every 1 Hard Leather.
To produce Standard Leather, hunt animals that provide Animal Hides or Hide Scraps. I usually focus on the larger wildlife because the return is simply better than wasting time chasing tiny creatures around the map.
Good targets include:
- Wild Cows
- Deer
- Giant Rats
If you’re still using a relatively low-tier weapon, don’t overcomplicate this part. A decent melee weapon or shortbow is enough to clear these animals quickly.
I personally prefer doing this while traveling through the early-game meadows rather than making a dedicated trip every time I run out. Once you know the areas where animals regularly spawn, collecting hides becomes something you can do almost passively.
A Simple Leather Farming Rule
Keep the 2:1 ratio in mind.
For every Hard Leather you plan to make, you need two Standard Leather. That means your leather stock disappears faster than you might expect.
If you’re preparing a larger Tier 4 gear upgrade, I would rather overfarm hides slightly than make three separate trips because I ran out halfway through crafting.
Step 4: Enter the Whispering Swamp for Swamp Tar
This is where the Hard Leather grind becomes considerably more interesting.
Swamp Tar is the raw material used to create Adhesive, and you need to venture into the Whispering Swamp to collect it.
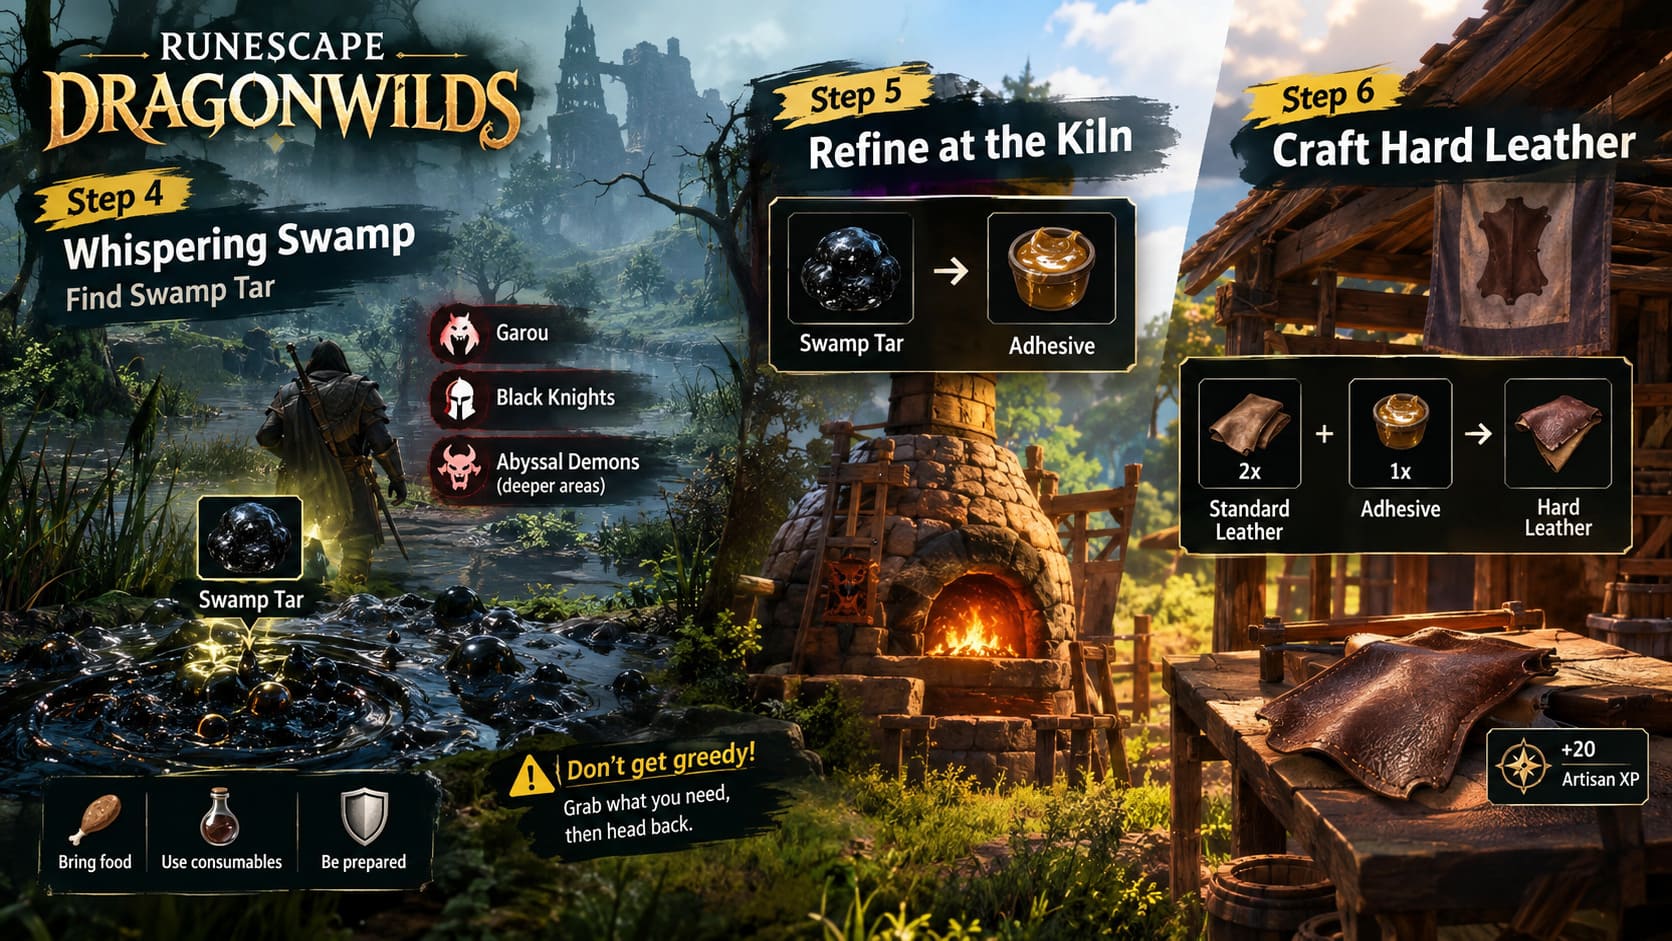
The area is dangerous enough that I would not treat this like a casual resource run. Bring food, useful consumables, and whatever defensive preparation you normally rely on for hostile environments.
Swamp Tar can be found around muddy areas and near pools of water. It has a distinctive dark, oily, bubbling appearance, so once you know what you’re looking for, it becomes much easier to spot.
Interact with the tar patches to collect the resource.
The trick is not getting greedy.
The Whispering Swamp contains hostile creatures and dangerous areas, and it is easy to turn a five-minute resource trip into a long corpse run because you decided to grab “just one more” tar patch.
I learned that lesson the annoying way.
Don’t Go Looking for Trouble in the Swamp
There are plenty of dangerous enemies in and around the swamp, including Garou and Black Knights, while deeper cave and corrupted areas can contain significantly stronger enemies such as Abyssal Demons.
For a Hard Leather farming trip, I see very little reason to fight everything.
Your objective is Swamp Tar, not a heroic clearing operation.
Grab what you need, avoid unnecessary fights, and get back to your base.
If you’ve unlocked useful fast-travel options such as Lodestones, use them. Losing a large collection of gathered materials because you stayed too long in a dangerous area is one of the easiest ways to turn an efficient farming route into a complete waste of time.
Step 5: Turn Swamp Tar Into Adhesive
Once you’re back at your base, the remaining process is thankfully simple.
Head to the Kiln, place your Swamp Tar into the input slot, and start the refinement process.
The result is Adhesive, which is the second ingredient required for Hard Leather.
This is why I recommend keeping your Kiln and Tannery close to each other at your main crafting base. The fewer times you have to run around your settlement looking for different stations, the faster the whole production cycle becomes.
Step 6: Craft Hard Leather
Now you can finally make the material you actually came for.
Walk over to the Tannery that has the Tanner’s Kit installed and open its crafting interface.
The upgraded station gives you the required input configuration.
Place:
- 2x Standard Leather
- 1x Adhesive
Then start the process.
After the crafting timer finishes, you will receive 1x Hard Leather and 20 Artisan XP.
That’s the entire recipe, but the real trick is keeping the supply chain running.
My Recommended Hard Leather Farming Loop
Once I had the process figured out, I stopped thinking about Hard Leather as something I needed to “farm” directly.
Instead, I use a simple loop:
Hunt → Tannery → Swamp → Kiln → Tannery → Gear
I collect animal hides whenever I’m traveling through suitable areas, process them into Standard Leather at home, then make a dedicated Whispering Swamp trip whenever my Adhesive reserves start getting low.
This is much less frustrating than waiting until I need a specific piece of Tier 4 gear and realizing I have absolutely nothing required to make it.
Keep These Materials Stocked
| Resource | Why Keep It Ready |
|---|---|
| Animal Hides | Main source of Standard Leather |
| Standard Leather | Requires 2 per Hard Leather |
| Swamp Tar | Raw material for Adhesive |
| Adhesive | Required for Hard Leather and Tanner’s Kit |
| Ash Planks | Important for advanced infrastructure |
| Bronze Bars | Required for the Tanner’s Kit |
What Can You Do With Hard Leather?
Once you’ve established a reliable supply, the material becomes much more valuable than it initially appears.
The major reason to produce it is Tier 4 armor progression, particularly for ranged-focused and hybrid builds.
Hard Leather also appears in additional advanced recipes, including certain reinforced equipment, shield-related crafting, and storage upgrades.
For me, this is the point where Dragonwilds starts rewarding preparation much more heavily. Instead of constantly reacting to whatever recipe the game throws at you, you can build a functioning production chain and let your base support your adventures.
That makes a huge difference when you’re preparing for tougher areas and major encounters.
Dragonwilds Runite Ore Location Guide: Where to Find and Mine Runite in 1.0 Update
Final Thoughts
Hard Leather looks like a simple crafting material, but getting it efficiently is really about understanding how RuneScape: Dragonwilds connects exploration with base management.
You need animals for hides, a Tannery for Standard Leather, the Sawmill and Bronze production for your upgraded infrastructure, the Whispering Swamp for Swamp Tar, and a Kiln for Adhesive. Once those pieces are in place, the actual Hard Leather recipe is incredibly easy.
My biggest advice is not to wait until you’re completely out of materials. Keep a healthy supply of Standard Leather and Adhesive in storage, and the next Tier 4 upgrade will feel like a normal crafting session instead of another resource hunt.
The Whispering Swamp is dangerous, but with a focused route and a little preparation, it becomes a manageable part of your regular farming cycle. And once your upgraded Tannery is running, those 20 Artisan XP crafts start adding up nicely.
For anyone pushing through the mid-game in the full RuneScape: Dragonwilds 1.0 release, Hard Leather is one of those materials worth preparing for early. Build the infrastructure, learn the farming loop, and suddenly the Tier 4 progression wall doesn’t feel nearly as intimidating.