The Blood of Dawnwalker Blacksmith Locations & Gear Upgrade Guide
The Blood of Dawnwalker does a surprisingly good job of making equipment feel important. In a lot of open-world RPGs, you pick up a new sword every twenty minutes, throw the old one into your inventory, and forget about it. Here, things work a little differently.
If you find a weapon you genuinely like, especially an Epic or Legendary sword, you can keep investing in it instead of constantly replacing it. That makes Blacksmiths extremely valuable, particularly once the enemies in Vale Sangora start hitting hard enough to punish every outdated piece of gear.
After spending a fair amount of time exploring the world, I quickly stopped treating blacksmiths as simple merchants. They became regular checkpoints: places to sell junk, improve my main weapon, grab useful combat manuals, and make sure Coen wasn’t walking into the next major encounter with equipment that was several levels behind.
This guide covers all four Blacksmith locations in The Blood of Dawnwalker, explains how weapon upgrades work, and goes over the special Uriashi questline that eventually leads to the Imbued Sword of St. Mihai.
Why Blacksmiths Matter So Much in Dawnwalker
The easiest way to underestimate blacksmiths is to think of them as traditional RPG vendors. They aren’t.

Blacksmiths are tied directly to your character progression. Their inventories can provide better weapons, combat manuals, and equipment, while their upgrade service lets you keep favorite weapons relevant as Coen becomes stronger.
The blacksmith icon is represented by a white sword on the map, making these locations fairly easy to recognize once you’ve discovered them.
The upgrade system is especially useful because a great weapon doesn’t automatically become worthless just because you leveled up.
That was one of my favorite parts of the system.
Finding a Legendary sword early actually feels exciting because you know it can remain part of your build rather than becoming obsolete almost immediately.
What You Can Do at a Blacksmith
| Service | What It Does |
|---|---|
| Buy Weapons | Purchase stronger swords and other available equipment |
| Buy Skill Manuals | Unlock additional combat abilities and passive upgrades |
| Improve Sword | Increase an existing weapon’s level |
| Sell Items | Clear inventory and turn unwanted loot into Denarii |
| Special Forging | Certain blacksmiths are involved in unique weapon quests |
The important thing is to keep some Denarii available. Upgrading expensive weapons later in the game can become brutally expensive.
How Weapon Upgrades Work
The basic idea is simple: take a weapon you already own to a blacksmith and select “Improve my sword.”
The weapon can then be raised toward the current level available to Coen.
There is also a useful shortcut that I strongly recommend remembering. You can use Y on a controller or V on keyboard to quickly push the weapon toward its maximum available upgrade level.
The exact cost depends heavily on the quality of the weapon.
A cheap Iron or Common sword isn’t going to destroy your wallet. Legendary equipment is another story.
By the later sections of the game, upgrading high-quality weapons can cost thousands of Denarii. That’s where the system starts forcing you to make real decisions about your equipment.
Personally, I wouldn’t upgrade every weapon I find.
Instead, I’d pick one or two weapons that actually fit the way I play Coen and put the majority of my money into those. Spending everything on a sword that you’re going to abandon ten minutes later is one of the easiest ways to make the economy feel unnecessarily tight.
The Golden Rule for Denarii
Don’t upgrade equipment just because you can. Upgrade the weapons you actually intend to use.
That sounds obvious, but it’s surprisingly easy to forget when you’re standing in front of a blacksmith with a decent amount of money.
Blacksmith Opening Hours: Don’t Ignore the Clock
One of the stranger aspects of the system is how closely blacksmith access is tied to the game’s day and night cycle.
Human blacksmiths generally operate during the daytime.
If you arrive at a workshop during the wrong part of the cycle, don’t assume you’ve found a bug. The merchant may simply be unavailable.
This matters because The Blood of Dawnwalker treats time as an actual gameplay resource. Traveling, certain activities, quests, and other actions can consume Time Segments, so randomly waiting around isn’t always ideal.
It is worth planning your blacksmith visits around your route.
If you’re already heading through a settlement during the day, that’s the perfect time to:
- Sell unwanted loot.
- Check the current weapon inventory.
- Purchase useful Combat Skill Manuals.
- Upgrade your primary sword.
- Restock before heading into dangerous territory.
That small routine saves quite a bit of frustration later.
All 4 Blacksmith Locations in The Blood of Dawnwalker
There are four major blacksmith locations worth knowing. They aren’t equally useful at every stage of the game, but learning where each one is can make exploration considerably easier.
1. Mircea — Starting Area Blacksmith
Mircea is the first blacksmith most players will encounter.
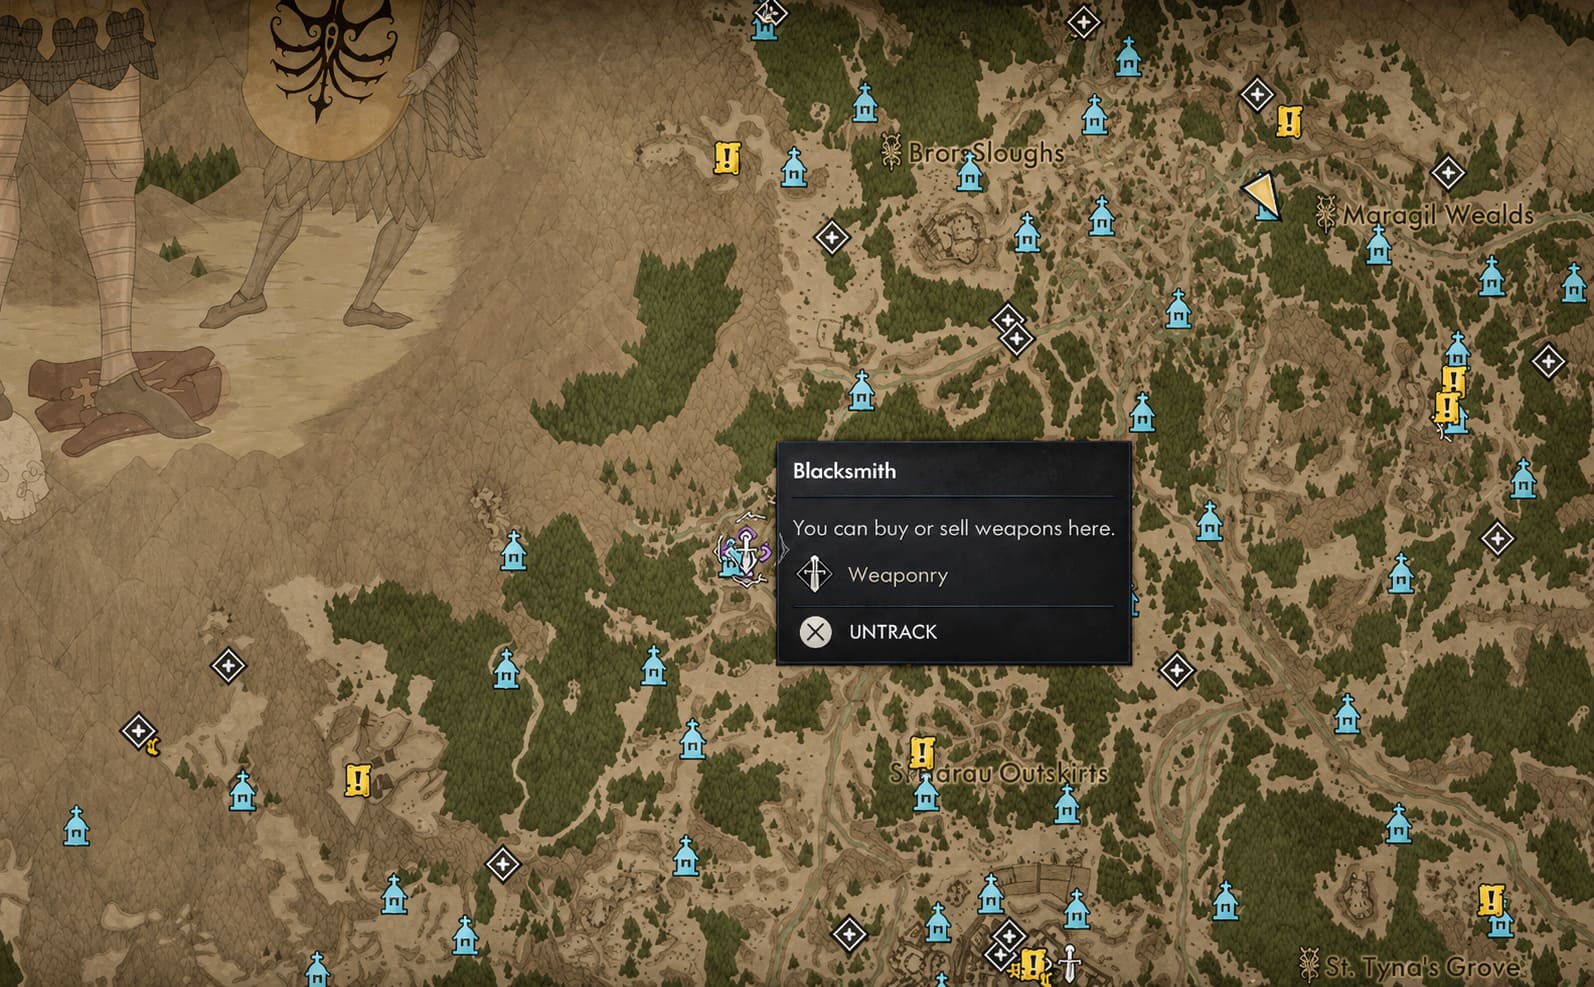
He is located in the starting area during the prologue, so you don’t need to go on some ridiculous treasure hunt to find him. The game naturally guides you toward his location as you progress through the opening sections.
And yes, you should use him.
The opening hours are exactly when your inventory starts filling with things you don’t really need. Selling junk to Mircea gives you the Denarii needed for your first meaningful equipment upgrades.
His stock can also provide some useful early alternatives to Coen’s basic Training Sword.
Among the notable early equipment are items such as the Common Sword, Gold-Knee Trousers, and Voyager’s Ruddy Cotehardie.
None of this is endgame equipment, obviously, but that isn’t the point.
Mircea is about getting Coen into a comfortable position before the game opens up.
My advice: before leaving the prologue area, make a point of selling your junk and checking Mircea’s inventory. It’s one of those small things that can make the next several hours noticeably easier.
2. Parlita Blacksmith — Central Vale Sangora
The blacksmith in Parlita is probably the one you’ll become most familiar with during the middle portion of the game.
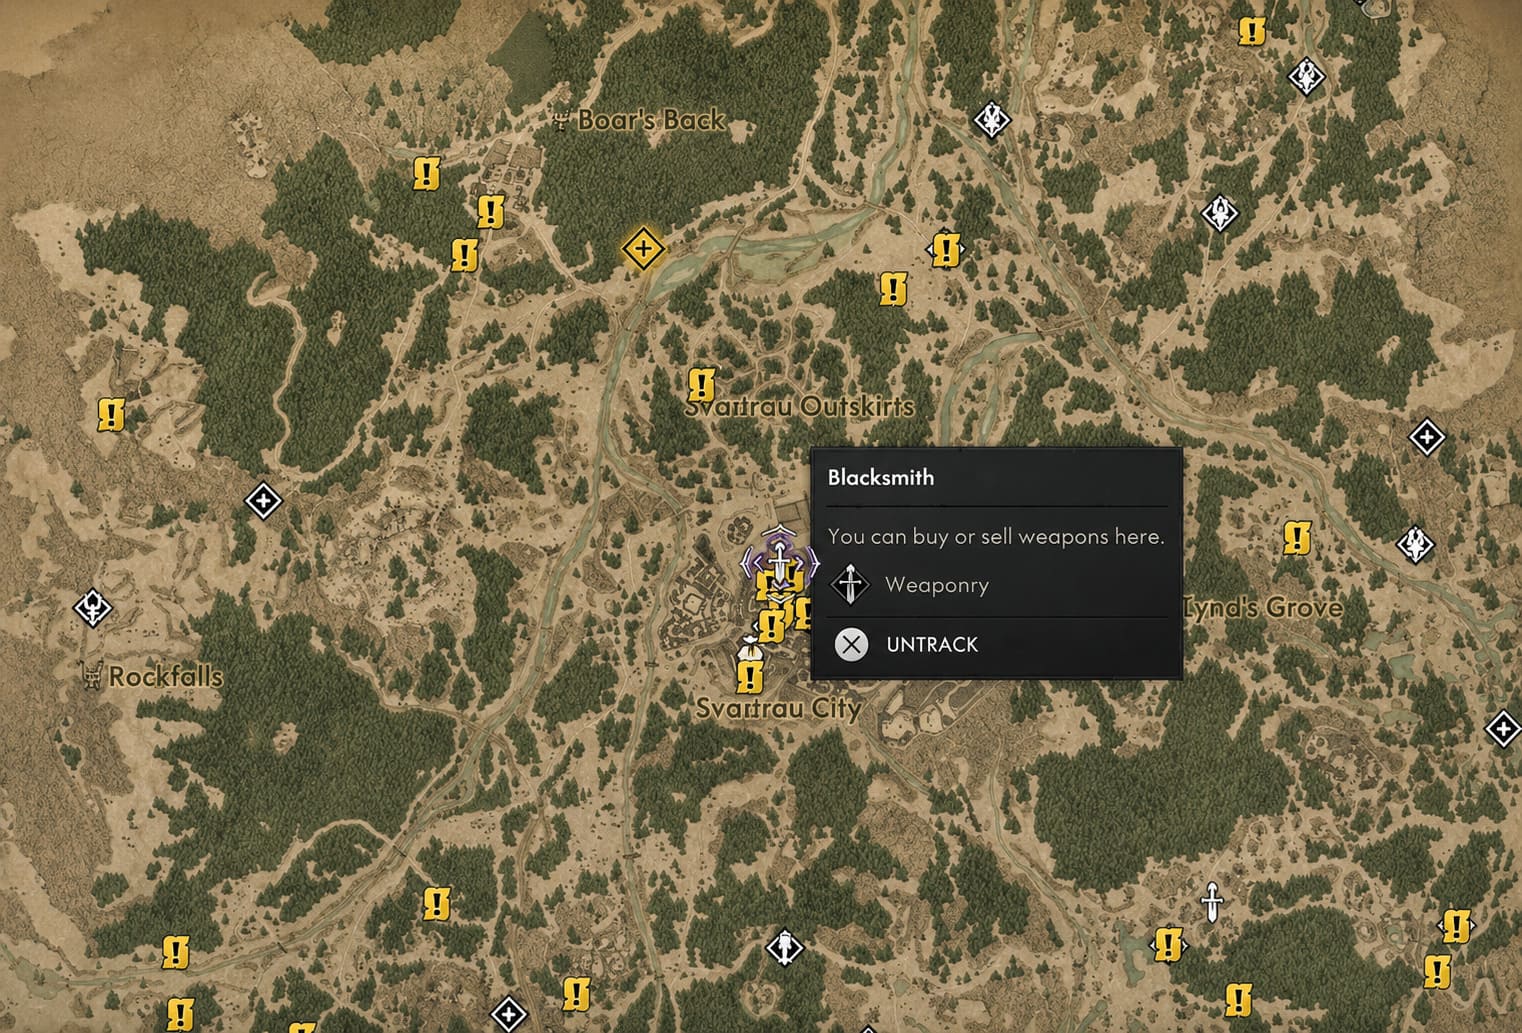
Parlita’s location makes it convenient because the settlement is positioned centrally enough to work as a natural resupply point during exploration.
The smithy itself is located around the settlement’s busy market area, so it isn’t particularly difficult to find once you’re inside the town.
There’s also some interesting history attached to the place.
Parlita is associated with the legendary Prizewinner, a weapon celebrated as one of the finest blades ever produced in the region.
That doesn’t automatically make every item sold here incredible, of course, but it gives the location some personality beyond simply being another vendor icon on the map.
As your character progresses, this is the blacksmith I’d recommend turning into a regular stop.
Sell → check stock → upgrade → leave.
It’s a simple routine, but it works.
3. Eastern Outpost Blacksmith
The third blacksmith can be found toward the eastern part of Vale Sangora, close to military positions and heavily guarded areas.
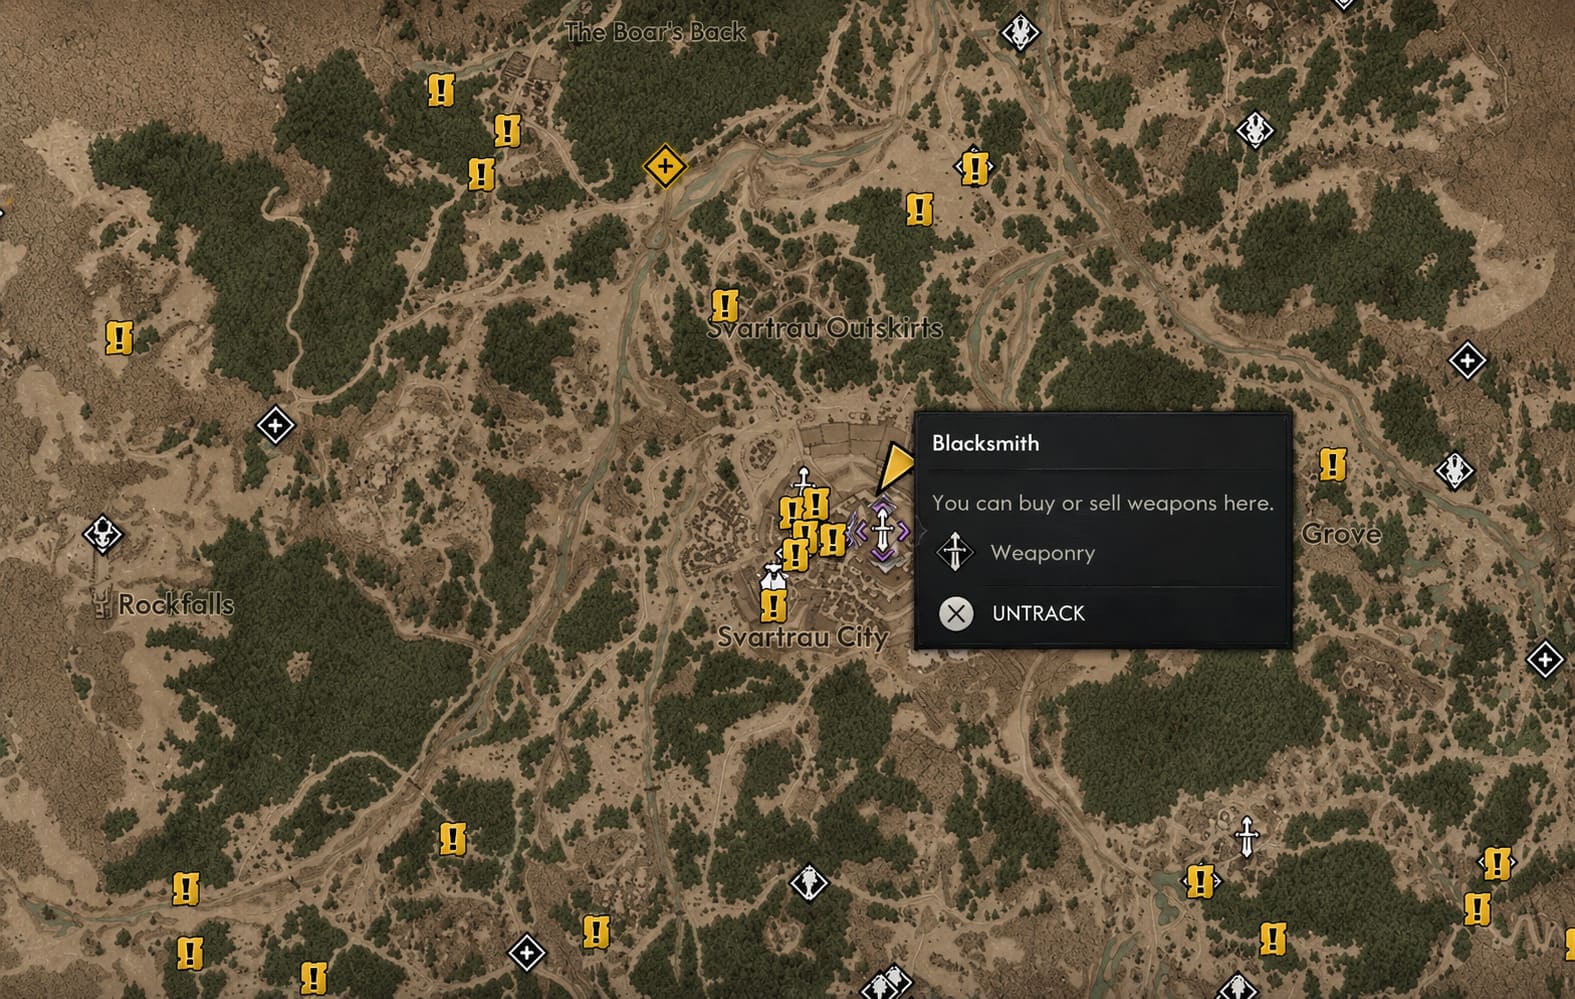
This location feels very different from Mircea’s quieter starting-area workshop.
The surrounding region is much more dangerous, with enemy camps, bandits, soldiers, and monsters making the journey considerably less comfortable.
That makes the blacksmith particularly useful as a staging point.
If you’re preparing for an extended trip into the eastern territories, this is a good place to make sure your main weapon is upgraded before you leave.
The vendor’s stock leans toward more combat-oriented equipment, and you can also find Combat Skill Manuals that are useful for developing a more aggressive melee-focused build.
For players who prefer direct physical combat rather than relying heavily on supernatural abilities, this blacksmith can become one of the more useful stops on the map.
4. Uriashi — The Remote Blacksmith of Briar Sloughs
Uriashi is easily the most interesting blacksmith in the game.
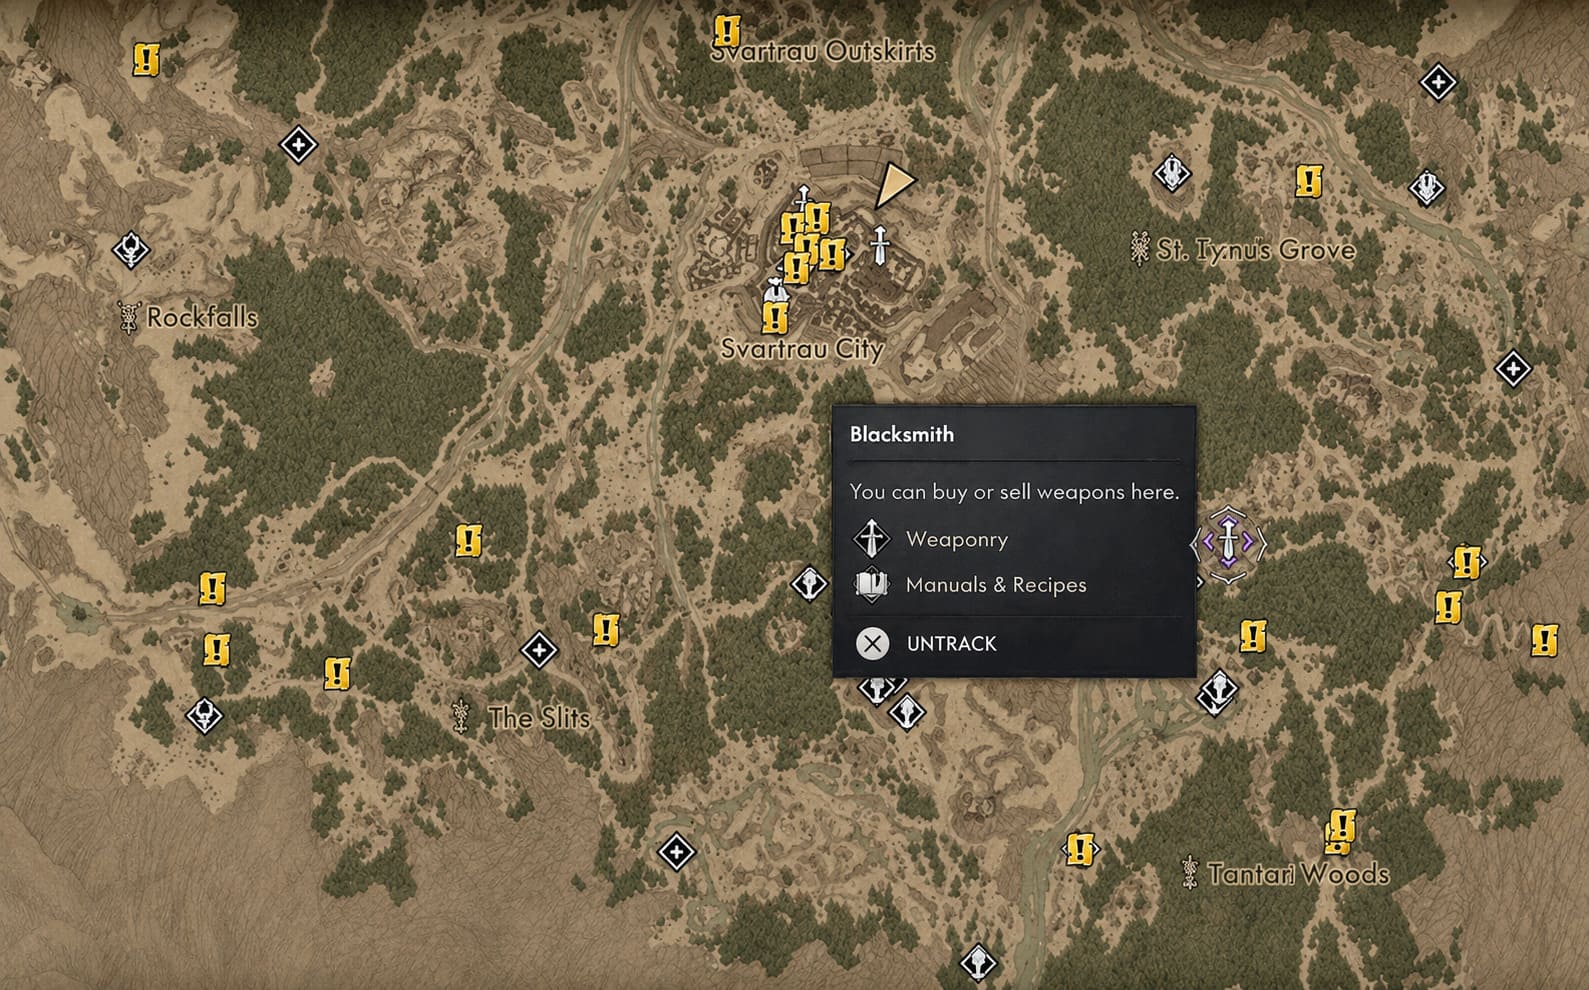
She’s not sitting comfortably inside a major settlement waiting for Coen to arrive with a pocket full of Denarii.
Instead, you’ll find her in the far northwest section of the Briar Sloughs, out in a remote wilderness area.
And yes, you can potentially reach this area surprisingly early.
But reaching Uriashi and actually using her are two different things.
She won’t simply start trading with you because you’ve managed to find her workshop. You need to progress through the relevant questline, “Forge It Anew,” before she becomes properly involved.
There’s also an amusing little detail that caught my attention: Uriashi can be startled.
If you rush around her workshop using high-speed movement or supernatural abilities such as Shapeshift or Mercurial Fervour, she may become frightened and temporarily stop interacting with you.
It’s a small detail, but it makes the location feel much less like a generic RPG vendor.
If she suddenly refuses to cooperate, don’t panic. Move away, give her a moment, and let the situation settle down.
Forge It Anew: How to Get the Imbued Sword of St. Mihai
This is where Uriashi becomes much more important.
The Forge It Anew questline eventually leads to one of the most impressive weapons available to Coen: the Imbued Sword of St. Mihai.
The process isn’t simply “bring money, receive sword.”
You’ll need to recover the pieces of the weapon and complete the forging ritual.
Here’s the basic progression.
1. Defeat St. Mihai
The quest begins around a desecrated crypt where Coen encounters the ancient creature known as St. Mihai.
After the confrontation, you’ll obtain the Broken Sword of St. Mihai.
Don’t immediately assume the weapon is useless.
This is the beginning of the quest rather than the end.
2. Search the Crypt Carefully
Use Focus Mode to investigate the area properly.
Among the discoveries is Mihai’s Journal, which provides information about the broken weapon and what needs to be done to restore it.
This is a good example of why I recommend actually looking around during major quest locations instead of sprinting directly toward the next objective marker.
3. Find the Three Sword Shards
The broken blade needs three missing pieces.
The three Sword Shards are hidden around the open world, with each associated with dangerous Kobold Dens.
Expect these areas to be substantially less comfortable than simply visiting a merchant in town.
Make sure you’re prepared before going shard hunting. There’s little point in reaching a dangerous den only to discover that your main weapon is several levels behind.
4. Return to Uriashi
Once you have the Broken Sword and all three shards, head back to the northwestern Briar Sloughs.
Uriashi can then begin rebuilding the weapon.
Each shard contributes to the restoration, and the sword becomes increasingly impressive as the process progresses.
5. Complete the Imbuement Ritual
Restoring the physical blade isn’t enough.
Uriashi explains that the sword has lost its supernatural energy and needs to be imbued.
You’ll then be directed toward an ancient shrine deeper in the wilderness.
This eventually leads to a confrontation with The Echoing Anger, a dangerous collection of hostile phantoms.
Once the area is cleared, you’ll find a glowing red orb above the central altar.
Interact with the altar and complete the ritual to finally create the Imbued Sword of St. Mihai.
Is the Imbued Sword of St. Mihai Worth the Effort?
In my opinion, absolutely.
The weapon isn’t impressive simply because the game labels it as legendary. Its actual combat characteristics make it worth pursuing if it fits your build.
The sword offers extremely strong base damage, improved critical potential, additional damage against supernatural enemies, and a unique Weapon Art built around broad spinning attacks.
That final ability is particularly satisfying when you’re surrounded.
Instead of poking away at individual enemies, the weapon lets Coen unleash wide attacks capable of hitting groups and knocking enemies down.
It’s the sort of weapon that actually feels different in your hands rather than simply having a larger number attached to it.
And that’s what I want from a special weapon in an RPG.
The Blood of Dawnwalker: All 9 General Store Locations & Merchant Guide
Best Blacksmith Strategy for a Playthrough
After dealing with all four locations, I’d recommend treating blacksmiths as part of your regular travel routine rather than something you visit only when the game tells you to.
Early game: use Mircea to sell junk and establish your first decent equipment setup.
Mid game: make Parlita your regular central resupply point and keep your main weapon upgraded.
Eastern exploration: use the outpost blacksmith before pushing into dangerous military and monster-heavy territory.
Late game and special gear: unlock Uriashi and complete the St. Mihai weapon quest if you’re interested in a powerful supernatural blade.
The biggest mistake is trying to upgrade everything.
Pick a primary weapon, keep it close to Coen’s current level, and spend the rest of your money only when a piece of equipment genuinely improves your build.
The Blood of Dawnwalker All Medic Locations Guide: Where to Find Every Doctor in Vale Sangora
Final Thoughts
The blacksmith system in The Blood of Dawnwalker isn’t the most complicated crafting mechanic I’ve seen in an RPG, but I actually think that’s part of why it works.
It gives weapons a sense of permanence.
When you discover a sword with a moveset or stats you really like, you don’t immediately have to throw it away because the next enemy dropped something with a slightly higher number. You can invest in it and carry it forward.
The four blacksmith locations also encourage you to learn the geography of Vale Sangora. Mircea handles the early game, Parlita becomes a convenient central hub, the eastern smith supports dangerous territory, and Uriashi provides the game’s most unusual forging experience.
And then there’s the Imbued Sword of St. Mihai, which gives the entire system a worthwhile long-term goal.
If you’re playing Dawnwalker and wondering where your next weapon upgrade should come from, don’t just follow the nearest quest marker. Check your map for that white sword icon, keep your Denarii under control, and make blacksmith visits part of your normal exploration loop.
You’ll spend less time struggling with underleveled gear and more time actually enjoying the combat.