Halloween The Game East Haddonfield Map Guide: All Power Switches Locations
East Haddonfield is the kind of map that makes you regret splitting up, but also punishes you for sticking together. In Halloween: The Game, IllFonic has taken the familiar Haddonfield setting and pushed it into a much rougher, industrial direction. Instead of relying entirely on quiet suburban streets and houses, this map throws survivors into grain facilities, warehouses, farmland, railway tracks, shipping containers, and abandoned roadside buildings. It looks enormous, feels exposed, and gives Michael Myers plenty of places to disappear.
After spending enough time looking at how the map flows, one thing becomes obvious: power management is not some optional side objective on East Haddonfield. It is one of the systems that can completely change the pace of a match. When the lights are working, survivors have better visibility and more confidence moving between objectives. When everything goes dark, every open field, doorway, and piece of industrial equipment suddenly becomes a potential hiding spot for Michael.
That makes learning the East Haddonfield power switch locations extremely valuable. The switches are not simply placed in one identical position every match, but their possible spawn areas are tied to recognizable landmarks. Once you understand those sectors, you stop wandering around like a lost survivor and start checking the right places immediately.
Halloween The Game Role Based Matchmaking How IllFonic Fixes Asymmetrical Queue Times
Why Power Matters So Much on East Haddonfield
The power system gives survivors another problem to solve while Michael is doing what Michael does best: turning a normal evening into a complete nightmare. The map contains several predetermined locations where electrical panels or breaker switches can appear, and their exact availability can vary from match to match.
This semi-random approach is actually one of the better ideas for a map like this. If every switch had one permanent location, experienced players would memorize the route within a few hours and the objective would become routine. Instead, you need to know the zones and landmarks first, then quickly identify which switch has spawned during the current match.
There is another important detail: Michael can interfere with the electrical system. Getting a breaker running does not necessarily mean the area is safe for the rest of the match. A sabotaged panel can plunge an important section back into darkness, forcing survivors to react instead of simply following a memorized checklist.
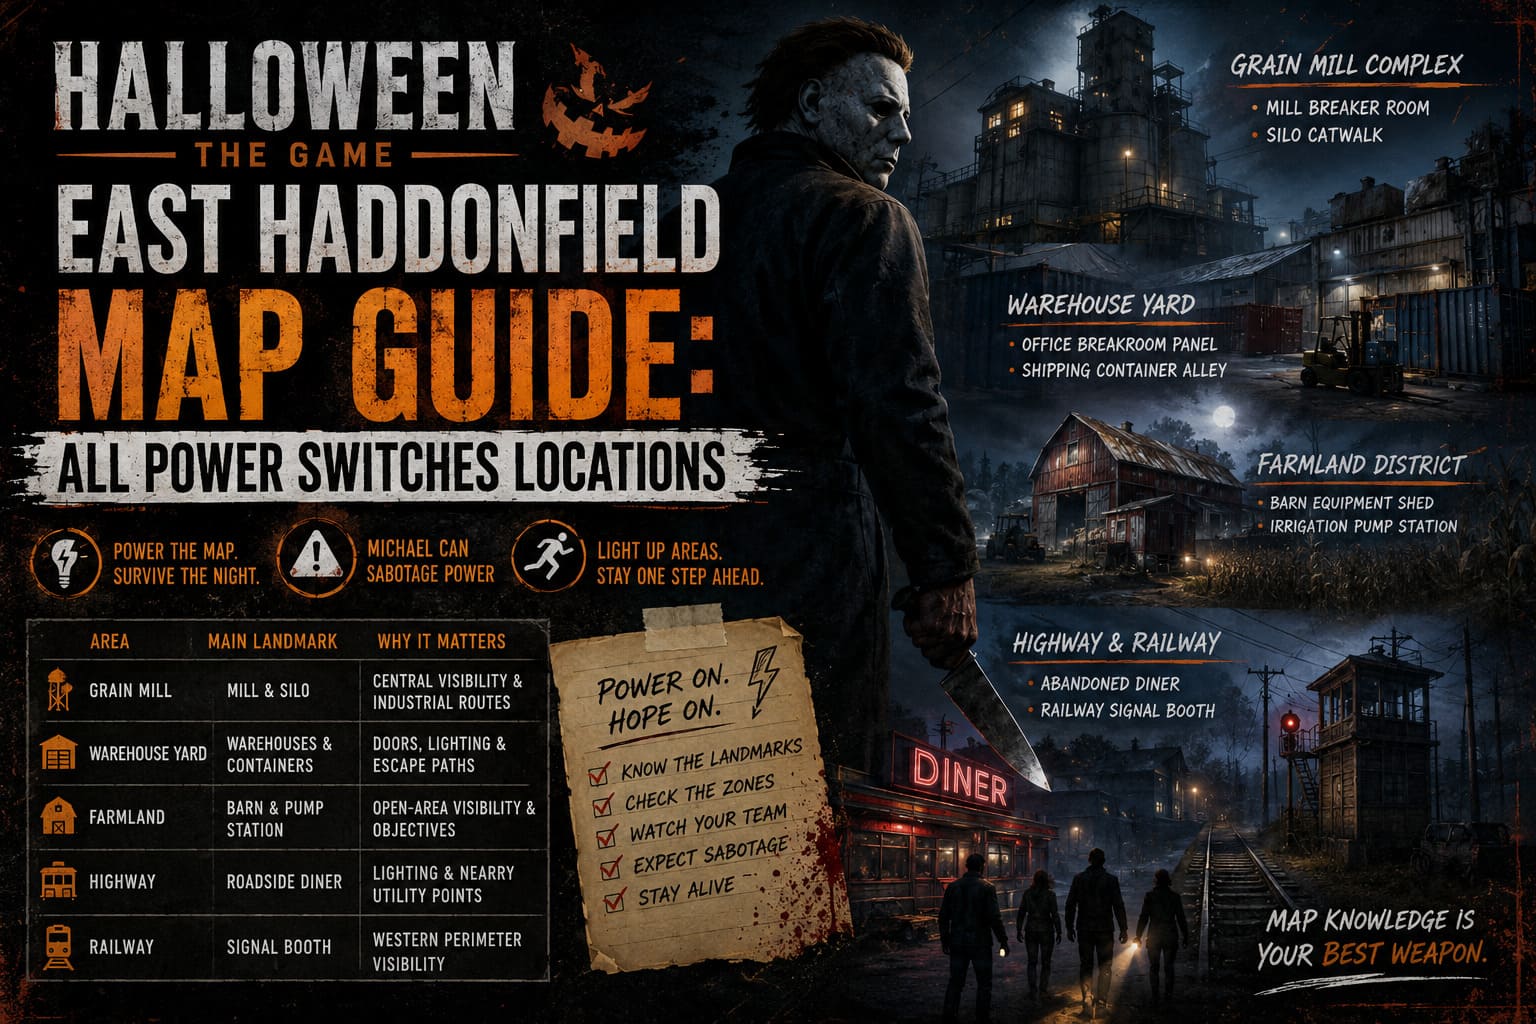
| Power Area | Main Landmark | Why It Matters |
|---|---|---|
| Grain Mill | Mill and Silo | Central visibility and industrial routes |
| Warehouse Yard | Warehouses and Containers | Doors, lighting and escape paths |
| Farmland | Barn and Pump Station | Open-area visibility and objectives |
| Highway | Roadside Diner | Lighting and nearby utility points |
| Railway | Signal Booth | Western perimeter visibility |
1. Grain Mill Complex Power Switches
The enormous Grain Mill is probably the first landmark you should learn. You can see the structure from a significant portion of East Haddonfield, making it an excellent navigation point when the map starts turning into a blacked-out maze.
The downside is equally obvious: the Grain Mill is dangerous. The interior combines vertical movement, industrial machinery, narrow walkways, and multiple opportunities for an ambush. Running into Michael inside the building can leave you with very little room to escape, especially if your team is already injured or separated.
Main Breaker Room
One possible power location is on the ground floor near the large industrial loading area. Look for a heavy entrance associated with electrical or high-voltage warning markings. The breaker panel can appear inside against one of the concrete structural supports.
This is an important switch because restoring power here can dramatically improve visibility around the lower section of the mill. If your team is using the building as a route between objectives, getting this area illuminated can save a ridiculous amount of time.
Exterior Silo Catwalk
Another possible switch can be found outside the mill around the elevated silo access. Follow the exterior metal stairs toward the storage structures and check the point where the catwalk connects with the first silo.
This location is particularly useful because it affects the outdoor space beneath the elevated structures. That matters more than it sounds. An illuminated yard gives survivors fewer blind spots to worry about when moving away from the mill.
2. Industrial Warehouses and Shipping Yard
North of the Grain Mill is a completely different kind of danger. The warehouse district has plenty of cover, but cover is not automatically safety. Stacked containers, machinery, office areas, and industrial doors can create short sightlines that make it surprisingly easy for Michael to close the distance.
Warehouse Office Breakroom Panel
Check the western warehouse and look for the elevated office section overlooking the main interior. The power panel can spawn along the rear wall, close to the breakroom area and recognizable objects such as a vending machine.
Activating this switch is useful because it can restore functionality to nearby industrial doors. Those doors can become extremely important during a chase. Having an additional exit instead of being forced through one predictable route can be the difference between escaping and getting cornered.
Shipping Container Alley
Outside the warehouse, search between the stacks of shipping containers. A breaker can appear beside a utility structure or pole in this container-filled section.
I would prioritize this switch whenever the surrounding yard is part of your team’s current route. Darkness between containers is exactly the kind of terrain Michael wants. Lighting the perimeter removes some of those nasty little hiding angles and makes crossing the yard considerably less stressful.
3. Farmland and Barn District
The eastern farmland is where East Haddonfield really starts showing its teeth. The scenery looks open and harmless at first, but open terrain can actually be one of the worst places for survivors when the lighting is poor.
There are fewer walls, buildings, and tight corners to use as emergency cover. If Michael gets a good position in the darkness, survivors crossing a field can become incredibly vulnerable.
Barn Equipment Shed
Start with the large wooden barn. Around the side facing the fields is a covered maintenance area or lean-to used for farm equipment. A power switch can appear above or around the workbench in this section.
This is one of those panels I would actively look for when my team needs to travel through the farmland. The exterior lights make a noticeable difference, especially when you’re already trying to keep track of teammates while watching the surrounding darkness.
Irrigation Pump Station
Near the crop fields, find the small concrete pump building responsible for the irrigation system. Check around the rear exterior wall for another possible breaker location.
This switch deserves extra attention because the surrounding area can connect to important survivor objectives. Turning the power on here isn’t simply about making the map prettier. It can improve access and visibility around an area your team may need later in the match.
4. Highway and Railway Power Switches
The outer boundaries of East Haddonfield contain some of the easiest locations to overlook. That’s dangerous because these areas can become extremely important during the final stages of a match when survivors are running low on options.
Abandoned Highway Diner
At the southern edge of the map, look for the abandoned roadside diner. Around the back is a small utility room that can contain a breaker panel. Spare tires and maintenance equipment help distinguish the area from the rest of the building.
Activating this switch brings light back to the diner area and can also affect nearby utility features. If you’re already working around this side of the map, it’s worth checking rather than blindly moving back toward the center.
Railway Signal Booth
Along the western railway boundary, search for the small wooden signal booth overlooking the tracks. You’ll need to climb the short ladder to reach the interior, where another possible breaker location can be found.
This one is easy to forget because the booth sits away from the main action. That’s exactly why it can be useful. Turning on the railway-side lighting gives survivors better awareness along the western edge and makes movement around the tracks less of a gamble.
How I Would Prioritize Power Switches
Not every switch deserves the same level of urgency. If you’re playing with a coordinated squad, the best approach is to think about where your team needs to go next rather than simply activating the closest panel you see.
If the next objective takes you through the farmland, power the barn or pump station first. If you’re working around the warehouses, getting the container yard illuminated can make your rotation considerably safer. The Grain Mill is valuable because of its central position, but I wouldn’t automatically send the entire team inside just because the building is nearby.
- Prioritize switches near active objectives. Don’t waste time lighting an irrelevant section of the map.
- Use one survivor as a lookout. The person interacting with the panel has limited attention and can miss Michael approaching.
- Keep track of your escape route. Turning on a breaker is pointless if you have no idea where you’ll run when the killer arrives.
- Recheck sabotaged areas. If a previously illuminated section suddenly becomes dark, assume the power has been disrupted and adapt immediately.
Don’t Make the Classic Survivor Mistake
The biggest mistake I see in games built around asymmetrical horror is treating every objective like a group project. Four survivors piling into the same room might feel safe for a few seconds, but it creates a terrible information problem. You aren’t covering the map, you’re basically putting four potential targets in one place.
East Haddonfield rewards controlled separation. Two survivors can work toward an objective while another player checks nearby routes and the fourth keeps an eye on another possible objective. Obviously, this requires communication, and solo queue can make that painful, but even basic callouts are better than everyone silently sprinting toward the same breaker.
Learn the Landmarks, Not Just the Switches
If you want to become genuinely good at Halloween: The Game East Haddonfield, don’t try to memorize a giant list of coordinates. Memorize the map’s identity instead: Grain Mill, warehouses, containers, barn, pump station, diner, railway booth.
Once those landmarks are burned into your memory, finding the power panels becomes much easier. You can enter a sector, immediately check the likely nodes, and move on without wasting half the match searching random corners.
That is especially important when Michael Myers is hunting you. Standing around staring at walls looking for a breaker is basically an invitation. The faster you can identify a power location, activate it, and get moving, the better your odds become.
Final Thoughts on East Haddonfield
East Haddonfield is easily one of the more interesting environments for players who enjoy the tactical side of asymmetrical horror. Its huge industrial structures and open farmland create a completely different rhythm from a traditional suburban Halloween setting. The map feels less predictable, and the power system gives both survivors and Michael another layer of decision-making.
For survivors, the key is preparation. Learn the major landmarks, understand the possible power sectors, keep your team moving, and never assume that turning on a light means you’re suddenly safe. Michael is still out there, and darkness is still his best friend.
If you can memorize the Grain Mill, warehouse yard, farmland, diner, and railway areas, you’ll already have a huge advantage over players who simply run toward whatever objective marker happens to be closest. On East Haddonfield, map knowledge isn’t just convenient—it can keep you alive.